Delete Multiple Records in PHP using Ajax And jQuery
Are you thinking of how to delete multiple records in PHP using ajax and jquery? In this post, I will share with you how to do it. Deleting records one by one could take time but using this functionality will be easier and saving time for your users. Here is the step by step of this tutorial.
Are you thinking of how to delete multiple records in PHP using ajax and jquery? In this post, I will share with you how to do it. Deleting records one by one could take time but using this functionality will be easier and saving time for your users. Here is the step by step of this tutorial. It is the continuation of my Employee Records Management Tutorial if you read my previous post.
1. Create Database
You will need to create your database first in any name you want. Just open your command prompt and do the process using MySQL command for easier just use PHPMyAdmin if you have installed it already at your localhost.
2. Create Table
Then run this SQL named "employees" table.
CREATE TABLE `employees` (
  `id` int(10) NOT NULL,
  `email` varchar(100) NOT NULL,
  `first_name` varchar(100) NOT NULL,
  `last_name` varchar(100) NOT NULL,
  `address` varchar(250) NOT NULL
) ENGINE=InnoDB DEFAULT CHARSET=utf8mb4;

ALTER TABLE `employees`
  ADD PRIMARY KEY (`id`);

ALTER TABLE `employees`
  MODIFY `id` int(10) NOT NULL AUTO_INCREMENT, AUTO_INCREMENT=1;
COMMIT;
3. Setup Database Connection
Following code below is our config.php file at available download source code we define our database credentials here.
<?php
	//set the servername
	define("SERVER_NAME", "localhost");
	//set the server username
	define("SERVER_UNAME", "root");
	// set the server password (you must put password here if your using live server)
	define("SERVER_UPASS", "");
	// set the database name
	define("SERVER_DB", "demos");

	// Include functions file
	require_once 'functions.php';

	// Set a variable $db and store db connection
	$db = connectDB();
?>
4. PHP Multi-Delete Function
Now we will create our multi-delete function on PHP and name it multi-delete.php.
<?php
	// include config file
	require_once 'config.php';

	//a PHP Super Global variable which used to collect data after submitting it from the form
	$request = sanitize($_REQUEST);

	// define result value
	$result = "";

	// Check if there is values for employee ids
	if(count($request['employee_ids'])):

		// Loop the employee ids for delete
		foreach($request['employee_ids'] as $employeeId):

			// Set the DELETE SQL data
			$sql = "DELETE FROM employees WHERE id='".$employeeId."'";

			// Process the query so that we will save the date of birth
			if ($db->query($sql)) {
			  	$result = "success";
			} else {
			  	$result = "Error: " . $sql . "<br>" . $db->error;
			}

		endforeach;

		// Close the connection after using it
		$db->close();
	endif;


	// Check if the iteration employees for delete has been successfully deleted
	if($result == "success"):
		echo "Selected employee(s) has been deleted.";
	else:
		// Check if empty then no value stored in this variable
		if($result == ""):
			echo "No deleted employees(s)";
		else://mysql error
			echo $result;
		endif;
	endif;

?>
5. Index HTML Code
Kindly check the following code index.html file below.
<!doctype html>
<html lang="en">
<head>
<title>Ajax Form Validation in PHP & MySQL using jQuery</title>
<!-- Bootstrap CSS -->
<link rel="stylesheet" href="https://maxcdn.bootstrapcdn.com/bootstrap/4.5.2/css/bootstrap.min.css">
<!-- Sweetalert 2 CSS -->
<link rel="stylesheet" href="assets/plugins/sweetalert2/sweetalert2.min.css">
<!-- Page CSS -->
<link rel="stylesheet" href="assets/css/styles.css">
</head>
<body>
<div class="container">
<br><br>
<h1>Ajax Form Validation in PHP & MySQL using jQuery</h1>
<br><br>
<div class="row">
<div class="col-md-4">
<h3>Add New Employee</h3>
<form action="save.php" id="form">
<div class="form-group">
<label for="email">Email</label>
<input class="form-control" type="text" name="email">
</div>
<div class="form-group">
<label for="first_name">First Name</label>
<input class="form-control" type="text" name="first_name">
</div>
<div class="form-group">
<label for="last_name">Last Name</label>
<input class="form-control" type="text" name="last_name">
</div>
<div class="form-group">
<label for="address">Address</label>
<textarea class="form-control" type="text" name="address" rows="3"></textarea>
</div>
<button type="button" class="btn btn-primary" id="btnSubmit">Submit</button>
</form>
</div>
<div class="col-md-8">
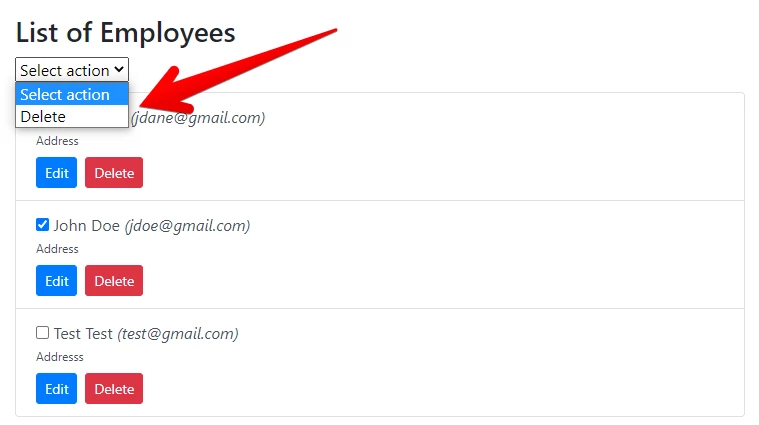
<h3>List of Employees</h3>
<div class="list-action-wrapper">
<select id="list-actions">
<option value="">Select action</option>
<option value="delete">Delete</option>
</select>
</div>
<div id="employees-list"></div>
</div>
</div>
</div>
<!-- The Modal -->
<div class="modal" id="edit-employee-modal">
<div class="modal-dialog">
<div class="modal-content">
<!-- Modal Header -->
<div class="modal-header">
<h4 class="modal-title">Edit Employee</h4>
<button type="button" class="close" data-dismiss="modal">×</button>
</div>
<!-- Modal body -->
<div class="modal-body">
<form action="update.php" id="edit-form">
<input class="form-control" type="hidden" name="id">
<div class="form-group">
<label for="email">Email</label>
<input class="form-control" type="text" name="email">
</div>
<div class="form-group">
<label for="first_name">First Name</label>
<input class="form-control" type="text" name="first_name">
</div>
<div class="form-group">
<label for="last_name">Last Name</label>
<input class="form-control" type="text" name="last_name">
</div>
<div class="form-group">
<label for="address">Address</label>
<textarea class="form-control" type="text" name="address" rows="3"></textarea>
</div>
<button type="button" class="btn btn-primary" id="btnUpdateSubmit">Update</button>
<button type="button" class="btn btn-danger float-right" data-dismiss="modal">Close</button>
</form>
</div>
</div>
</div>
</div>
<!-- Must put our javascript files here to fast the page loading -->
<!-- jQuery library -->
<script src="https://ajax.googleapis.com/ajax/libs/jquery/3.5.1/jquery.min.js"></script>
<!-- Popper JS -->
<script src="https://cdnjs.cloudflare.com/ajax/libs/popper.js/1.16.0/umd/popper.min.js"></script>
<!-- Bootstrap JS -->
<script src="https://maxcdn.bootstrapcdn.com/bootstrap/4.5.2/js/bootstrap.min.js"></script>
<!-- Sweetalert2 JS -->
<script src="assets/plugins/sweetalert2/sweetalert2.min.js"></script>
<!-- Page Script -->
<script src="assets/js/scripts.js"></script>
</body>
</html>In the following code below, we have an element from the HTML code above. In this element, I display here the lists of employees via ajax.
<div id="employees-list"></div>6. Displaying Lists of Employees via Ajax
The following javascript code below will display all the employees via ajax. This function will be found at scripts.js.
function all()
{
// Ajax config
$.ajax({
type: "GET", //we are using GET method to get all record from the server
url: 'all.php', // get the route value
beforeSend: function () {//We add this before send to disable the button once we submit it so that we prevent the multiple click
ajaxLoader("#employees-list", "show");
},
success: function (response) {//once the request successfully process to the server side it will return result here
// Parse the json result
response = JSON.parse(response);
var html = "";
// Check if there is available records
if(response.length) {
html += '<div class="list-group">';
// Loop the parsed JSON
$.each(response, function(key,value) {
// Our employee list template
html += '<a href="javascript:void(0)" class="list-group-item list-group-item-action">';
html += "<p><input type='checkbox' value='"+value.id+"' class='multi-options-action'> " + value.first_name +' '+ value.last_name + " <span class='list-email'>(" + value.email + ")</span>" + "</p>";
html += "<p class='list-address'>" + value.address + "</p>";
html += "<button class='btn btn-sm btn-primary mt-2' data-toggle='modal' data-target='#edit-employee-modal' data-id='"+value.id+"'>Edit</button>";
html += "<button class='btn btn-sm btn-danger mt-2 ml-2 btn-delete-employee' data-id='"+value.id+"' typle='button'>Delete</button>";
html += '</a>';
});
html += '</div>';
} else {
html += '<div class="alert alert-warning">';
html += 'No records found!';
html += '</div>';
}
// Insert the HTML Template and display all employee records
$("#employees-list").html(html);
},
complete: function() {
ajaxLoader("#employees-list", "hide");
}
});
}In the above code, I added a checkbox element which you can see below. I added it to the employee list group item template so that the checkbox will appear before the employee name.
<input type='checkbox' value='"+value.id+"' class='multi-options-action'>7. Multi-Delete jQuery And Ajax Function
This function will generate the checked employee's checkbox for deletion and push it to an array then post it to the server so that the PHP function can process it and delete it to our database. You can find this function in the scripts.js file which you can download below.
function multiDelete()
{
	$("#list-actions").on("change", function() {
		var $actionEl = $(this);
		// Get our action value
		var action = $actionEl.val();
		// We will store here our checked employees
		var employeeIds = [];
		// This function will reset the selected actions after submitting
		var resetAction = function() {
			$actionEl.prop('selectedIndex',0);
		};

		// Iterate the checked employee for deletion
		$(".multi-options-action").each(function() {
			if($(this).is(":checked")) {
				// store employee id to employeeIds array
				employeeIds.push($(this).val())
			}
		});

		// Check if the action is delete
		if(action == "delete") {
			// Check if there is checked employee for delete
			if(employeeIds.length) {
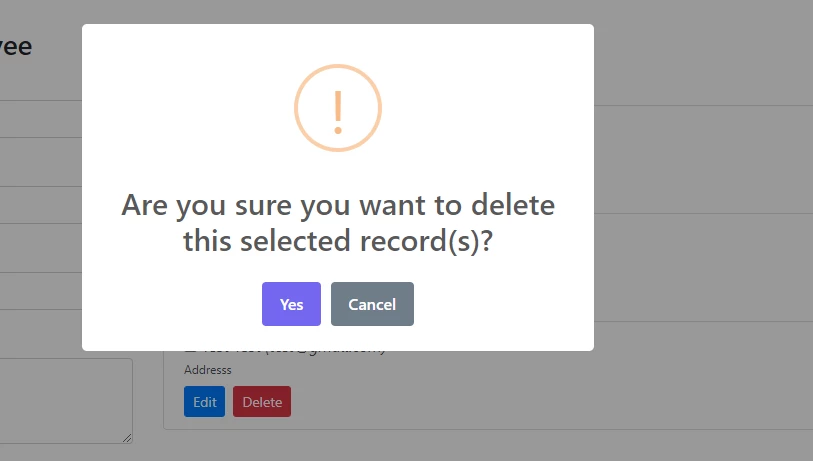
				// Sweetalert message confirmation
				Swal.fire({
					icon: 'warning',
				  	title: 'Are you sure you want to delete this selected record(s)?',
				  	showDenyButton: false,
				  	showCancelButton: true,
				  	confirmButtonText: 'Yes'
				}).then((result) => {

					// Check if confirmed
					if (result.isConfirmed) {
						$.ajax({
					        type: "POST",
					        url: "multi-delete.php",
					        data: {employee_ids : employeeIds},
					        cache: false,
					        success: function(response){
					        	// Reload lists of employees
				            	all();
				            	// Display response message
					            Swal.fire('Success.', response, 'success')
					        }
					    });
					}

					//reset action selected
				   	resetAction();

				});
			} else {
				//reset action selected
				resetAction();
				// Display warning message
				Swal.fire('Warning.', "No selected record(s)", 'warning')
			}
		}

	});
}
Now you have the process already and an idea on how to multi-delete the records using ajax in PHP. I hope it helps. You can download the source code of this example so that you will see it in action.
Thank you for reading. Please share with your friend if you think this is helpful. Happy coding :)





Leave a Comment