Laravel 9 Socialite Login with Google Complete Tutorial
In this tutorial, I will show you how to add a Laravel 9 socialite login with a Google account. Sometimes our users are lazy to log in with their system credentials.

In this tutorial, I will show you how to add a Laravel 9 socialite login with a Google account. Sometimes our users are lazy to log in with their system credentials. So we need to add this feature so that they just click and connect their Google account and log in directly to our system.
It comes with a complete tutorial so that you will learn step by step how to implement the social login in Laravel 9.
Okay, let's start.
Step 1: Clone my previous User Authentication
To shorten this tutorial we need to clone my code about Laravel 9 login just copy the repo link below:
git clone https://github.com/codeanddeploy/laravel8-authentication-example.gitOnce done copy the folder inside your htdocs folder if you are using Xampp.
And rename the folder of what you want.
After the folder is already inside the htdocs. Then let's run the following command I expect that you have a basic knowledge about running composer for your Laravel project.
composer updateNOTE: Before running the command above and other commands of this tutorial you need to open it in the terminal and point it with your project directory.
Okay, let's continue...
Once the vendors are already installed. Let's sure to run the command below to copy the .env from .env.example.
@php -r "file_exists('.env') || copy('.env.example', '.env');"Then let's run another command to generate the project key.
php artisan key:generateStep 2: Create and Setup DB Credentials
Now let's create a new database. You can name what you need.
So go to your PHPMyAdmin if you have or database management app then creates a new database.
Once done setting up your .ENV credentials.
DB_CONNECTION=mysql
DB_HOST=127.0.0.1
DB_PORT=3306
DB_DATABASE=your_db_name_here
DB_USERNAME=your_db_username
DB_PASSWORD=your_db_password_leave_blank_if_no_password
Step 3: Install Laravel Socialite Package
Now let's install our Laravel Socialite package. To do this kindly see the below command.
composer require laravel/socialiteStep 4: Create Google App
To work our Google social login we need to create Google App and get the credentials and attach it to our project. But if you have an existing Google app you can skip this, if not then visit this link Google Developers Console then follow the screen below:
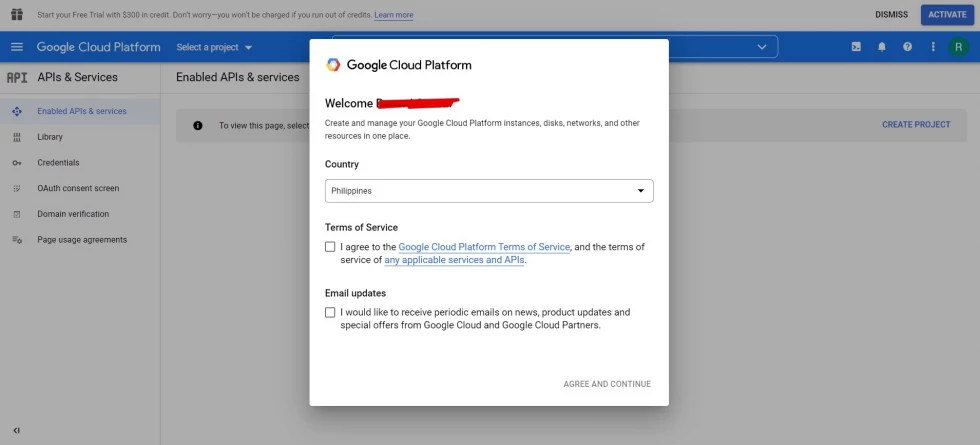
As you can see there is a pop-up box. Just check the Terms of service then click Agree and Continue.
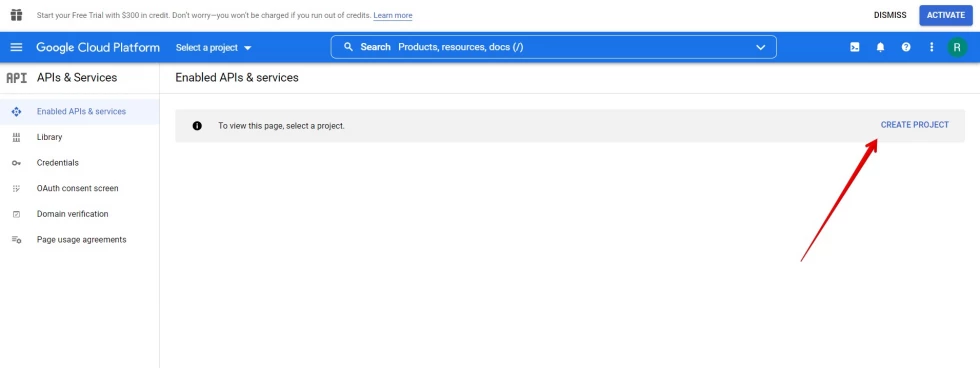
Then click the CREATE PROJECT to continue.
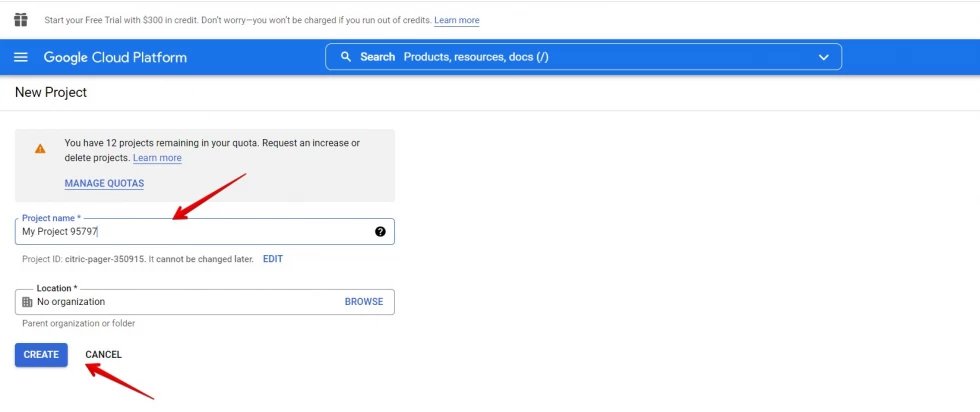
Then input your project name and organization (you can set it as No organization) then click CREATE.
NOTE: If you have a project already you can skip the above steps. And just select your current project name created previously.
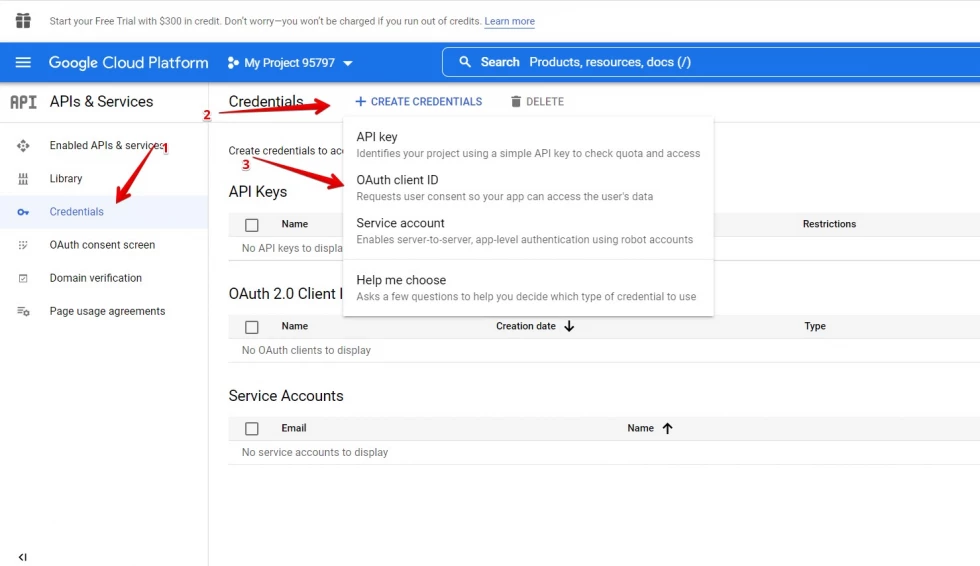
Now let's click the Credentials after creating the project or the selected project.
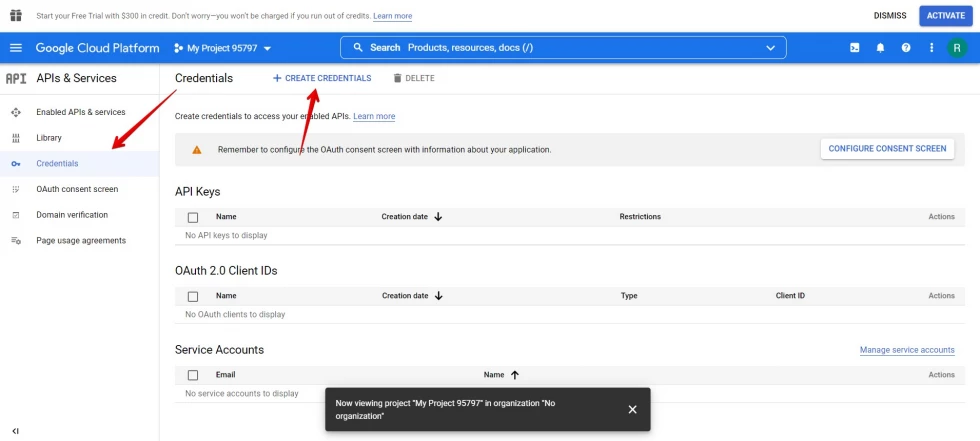
Then click + CREATE CREDENTIALS button.
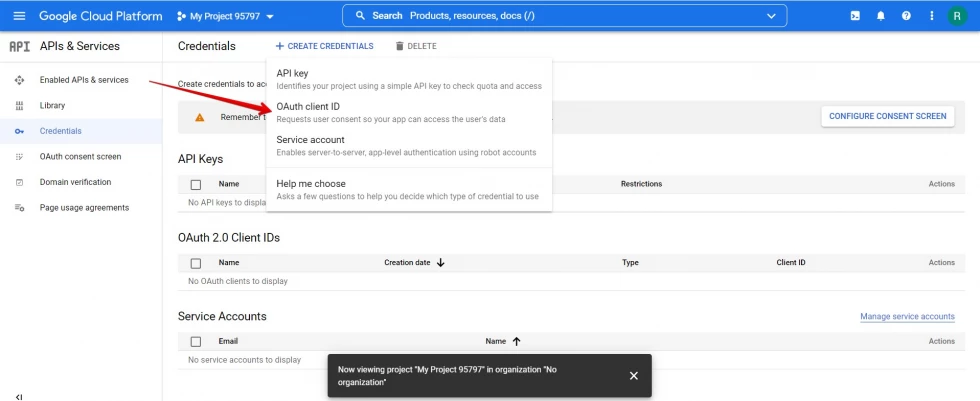
Then click OAuth client ID.
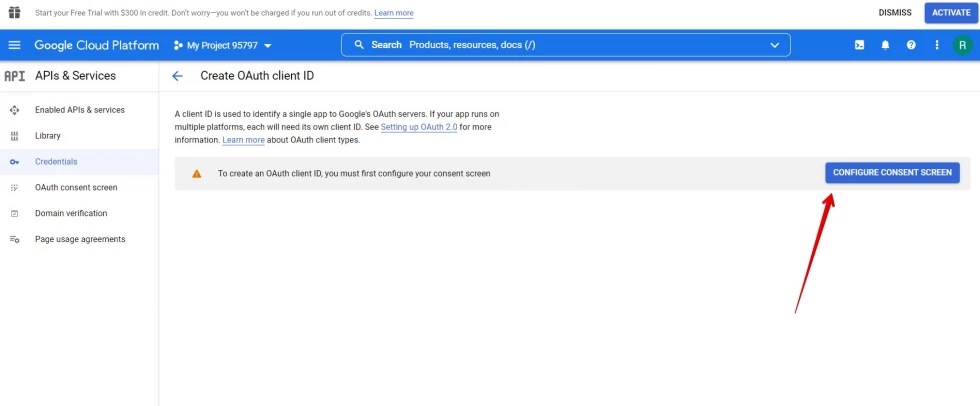
Then click the CONFIGURE CONSENT SCREEN.
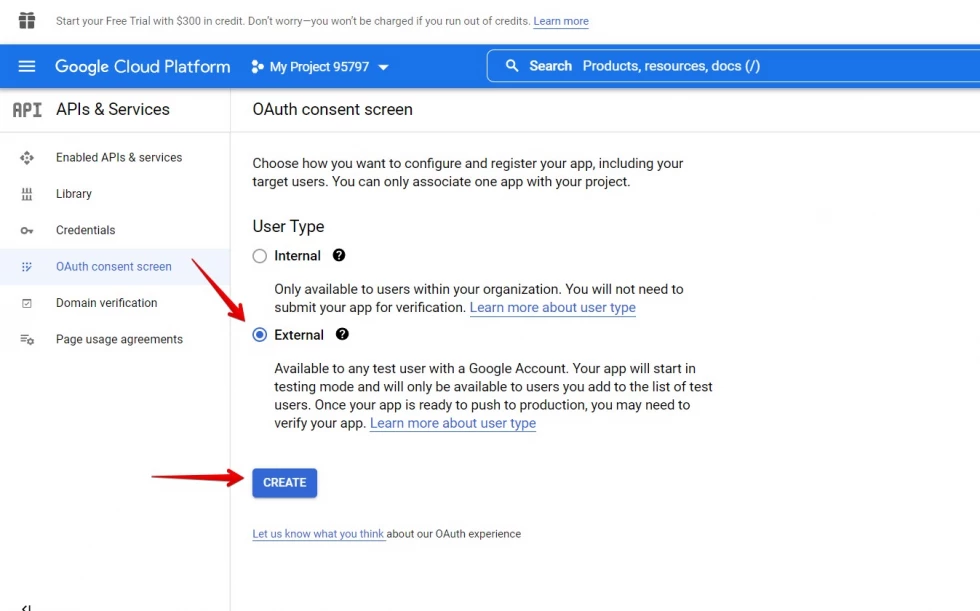
It seems they need verification so for now to continue with this tutorial I will click the External because the Internal is not yet available for this account I'm using.
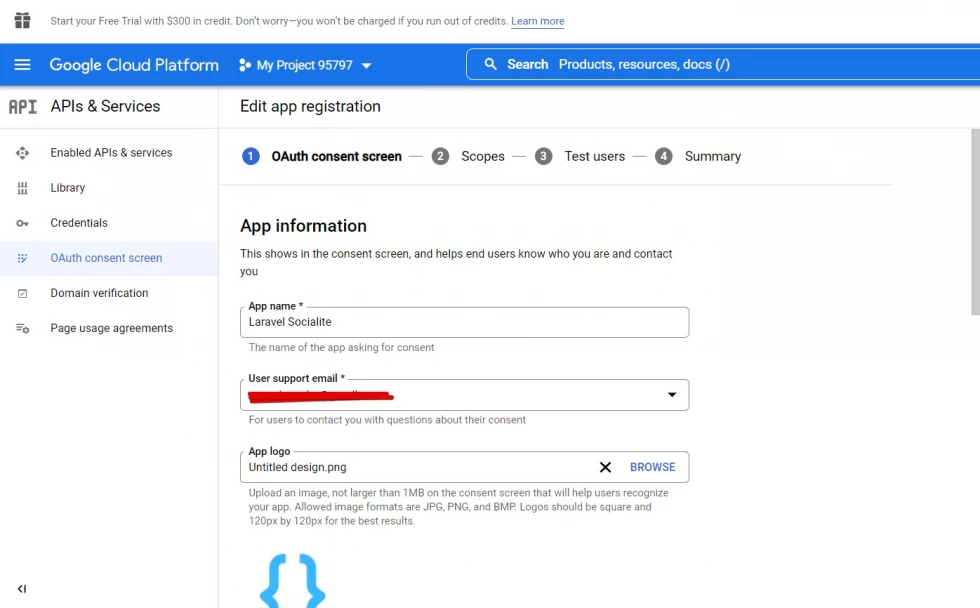
If your account is new you need to finish the OAuth consent screen and provide the important details they ask for.
Once the consent is finished then we will go back to the Credentials.
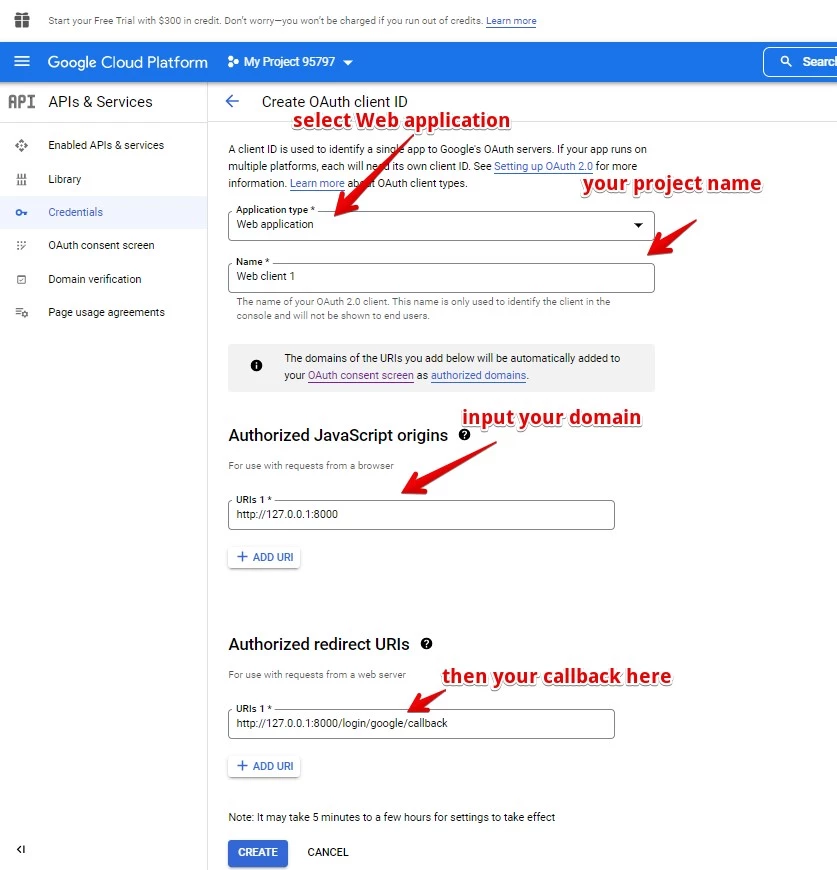
As you can see below there is an option for Application type then you need to select Web application. Then set the name of your project/product name.
Then also set your Authorized Javascript origins and Authorized redirect URIs see the below screenshot. Then click SAVE.
Then once done it will display a pop-up box for your project credentials.
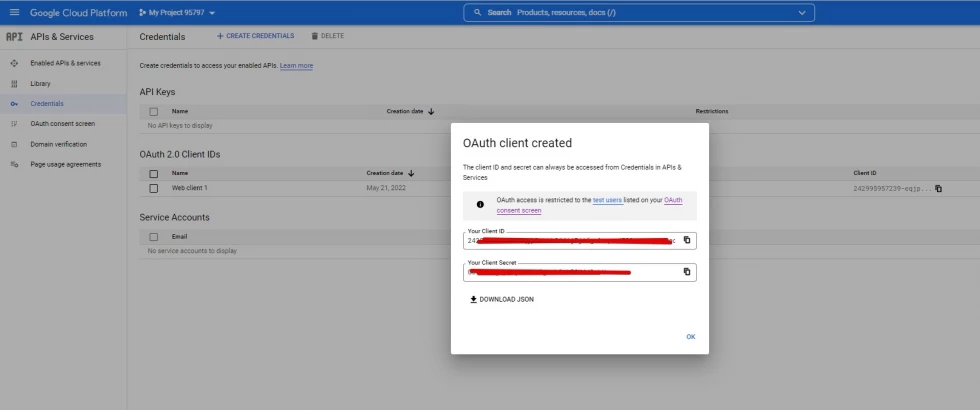
Then copy the "Your Client ID" value and "Your Client Secret" value then set up it to your app/config/services.php config.
See the below example:
return [
    ....
    'google' => [
        'client_id' => 'add Your Client ID',
        'client_secret' => 'add Your Client Secret',
        'redirect' => 'http://127.0.0.1:8000/login/google/callback',
    ],
]
Step 5: Add New Column to Users Table
Now, let's add the google_id column to our users table just run the following command:
php artisan make:migration add_google_id_column_to_users_tableThen set up the migration code see below example:
<?php

use Illuminate\Database\Migrations\Migration;
use Illuminate\Database\Schema\Blueprint;
use Illuminate\Support\Facades\Schema;

return new class extends Migration
{
    /**
     * Run the migrations.
     *
     * @return void
     */
    public function up()
    {
        Schema::table('users', function (Blueprint $table) {
            $table->string('google_id')->nullable();
        });
    }

    /**
     * Reverse the migrations.
     *
     * @return void
     */
    public function down()
    {
        Schema::table('users', function (Blueprint $table) {
            $table->dropColumn('google_id');
        });
    }
};
The run the migrate command:
php artisan migrateStep 6: Add Fillable Column to Users Model
Then let's add the google_id column to our fillable array property in the User.php model.
See below sample code App/Models/User.php:
<?php

namespace App\Models;

use Illuminate\Contracts\Auth\MustVerifyEmail;
use Illuminate\Database\Eloquent\Factories\HasFactory;
use Illuminate\Foundation\Auth\User as Authenticatable;
use Illuminate\Notifications\Notifiable;
use Laravel\Sanctum\HasApiTokens;

class User extends Authenticatable
{
    use HasApiTokens, HasFactory, Notifiable;

    /**
     * The database table used by the model.
     *
     * @var string
     */
    protected $table = 'users';

    /**
     * The attributes that are mass assignable.
     *
     * @var array<int, string>
     */
    protected $fillable = [
        'name',
        'email',
        'username',
        'password',
        'google_id'
    ];

    /**
     * The attributes that should be hidden for serialization.
     *
     * @var array<int, string>
     */
    protected $hidden = [
        'password',
        'remember_token',
    ];

    /**
     * The attributes that should be cast.
     *
     * @var array<string, string>
     */
    protected $casts = [
        'email_verified_at' => 'datetime',
    ];

    /**
     * Always encrypt password when it is updated.
     *
     * @param $value
     * @return string
     */
    public function setPasswordAttribute($value)
    {
        $this->attributes['password'] = bcrypt($value);
    }
}
Step 7: Add Route for our Laravel Socialite
In this part, we will add the Laravel socialite route for our google. See the sample code below.
Inside routes/web.php code let's add the code below:
/* Google Social Login */
Route::get('/login/google', 'GoogleLoginController@redirect')->name('login.google-redirect');
Route::get('/login/google/callback', 'GoogleLoginController@callback')->name('login.google-callback');
Here is the full code of our routes.
<?php

use Illuminate\Support\Facades\Route;

/*
|--------------------------------------------------------------------------
| Web Routes
|--------------------------------------------------------------------------
|
| Here is where you can register web routes for your application. These
| routes are loaded by the RouteServiceProvider within a group which
| contains the "web" middleware group. Now create something great!
|
*/

Route::group(['namespace' => 'App\Http\Controllers'], function()
{
    /**
     * Home Routes
     */
    Route::get('/', 'HomeController@index')->name('home.index');

    Route::group(['middleware' => ['guest']], function() {
        /**
         * Register Routes
         */
        Route::get('/register', 'RegisterController@show')->name('register.show');
        Route::post('/register', 'RegisterController@register')->name('register.perform');

        /**
         * Login Routes
         */
        Route::get('/login', 'LoginController@show')->name('login.show');
        Route::post('/login', 'LoginController@login')->name('login.perform');

        /* Google Social Login */
        Route::get('/login/google', 'GoogleLoginController@redirect')->name('login.google-redirect');
        Route::get('/login/google/callback', 'GoogleLoginController@callback')->name('login.google-callback');

    });

    Route::group(['middleware' => ['auth']], function() {
        /**
         * Logout Routes
         */
        Route::get('/logout', 'LogoutController@perform')->name('logout.perform');
    });
});
Step 8: Add Controller
In this step let's add a controller for our social login. Run the following command:
php artisan make:controller GoogleLoginControllerHere is the full code of our GoogleLoginController.
<?php

namespace App\Http\Controllers;

use App\Models\User;
use Illuminate\Http\Request;
use Illuminate\Support\Facades\Auth;
use Laravel\Socialite\Facades\Socialite;

class GoogleLoginController extends Controller
{
    /**
     * Create a new controller instance.
     *
     * @return void
     */
    public function redirect()
    {
        return Socialite::driver('google')->redirect();
    }

    /**
     * Create a new controller instance.
     *
     * @return void
     */
    public function callback()
    {
        try {

            $user = Socialite::driver('google')->user();

            $finduser = User::where('google_id', $user->id)->first();

            if ( $finduser ) {

                Auth::login($finduser);

                return redirect()->intended('/');

            } else {
                $newUser = User::create([
                    'name' => $user->name,
                    'email' => $user->email,
                    'google_id'=> $user->id,
                    'password' => 'dummypass'// you can change auto generate password here and send it via email but you need to add checking that the user need to change the password for security reasons
                ]);

                Auth::login($newUser);

                return redirect()->intended('/');
            }

        } catch (Exception $e) {
            dd($e->getMessage());
        }
    }
}
Step 9: Fix the issue of the Username Column
After testing with our code above we have an issue with our username field because it is required and if we log in with Google it will occur an error because no value. So to fix it let's change the settings of this column to nullable.
To work it change() method in migration we need to install doctrine/dbal. So let's run the command first:
composer require doctrine/dbalOnce done let's run the migration command to change the username settings.
php artisan make:migration change_username_column_to_users_tableThen put this code below inside the new migration created.
<?php

use Illuminate\Database\Migrations\Migration;
use Illuminate\Database\Schema\Blueprint;
use Illuminate\Support\Facades\Schema;

return new class extends Migration
{
    /**
     * Run the migrations.
     *
     * @return void
     */
    public function up()
    {
        Schema::table('users', function (Blueprint $table) {
            $table->string('username')->nullable()->change();
        });
    }

    /**
     * Reverse the migrations.
     *
     * @return void
     */
    public function down()
    {
        Schema::table('users', function (Blueprint $table) {
            $table->string('username')->unique();
        });
    }
};
Then run migrate command:
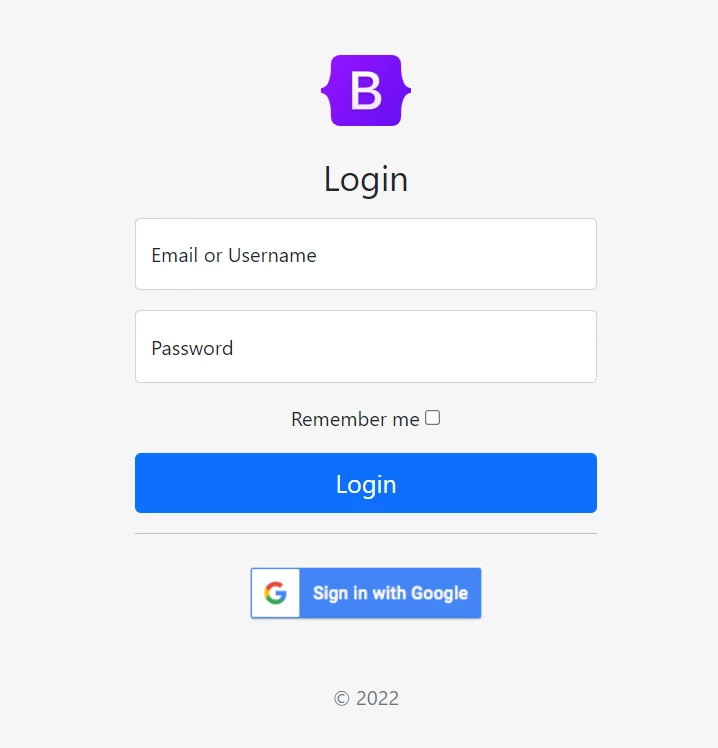
php artisan migrateStep 10: Update Login View Blade
In our resources/views/auth/login.blade.php let's modify our code. See below the updated code:
@extends('layouts.auth-master')

@section('content')
    <form method="post" action="{{ route('login.perform') }}">

        <input type="hidden" name="_token" value="{{ csrf_token() }}" />
        <img class="mb-4" src="{!! url('images/bootstrap-logo.svg') !!}" alt="" width="72" height="57">

        <h1 class="h3 mb-3 fw-normal">Login</h1>

        @include('layouts.partials.messages')

        <div class="form-group form-floating mb-3">
            <input type="text" class="form-control" name="username" value="{{ old('username') }}" placeholder="Username" required="required" autofocus>
            <label for="floatingName">Email or Username</label>
            @if ($errors->has('username'))
                <span class="text-danger text-left">{{ $errors->first('username') }}</span>
            @endif
        </div>

        <div class="form-group form-floating mb-3">
            <input type="password" class="form-control" name="password" value="{{ old('password') }}" placeholder="Password" required="required">
            <label for="floatingPassword">Password</label>
            @if ($errors->has('password'))
                <span class="text-danger text-left">{{ $errors->first('password') }}</span>
            @endif
        </div>

        <div class="form-group mb-3">
            <label for="remember">Remember me</label>
            <input type="checkbox" name="remember" value="1">
        </div>

        <button class="w-100 btn btn-lg btn-primary" type="submit">Login</button>

        <hr>

        <div class="flex items-center justify-end mt-4">
            <a href="{{ url('login/google') }}">
                <img src="https://developers.google.com/identity/images/btn_google_signin_dark_normal_web.png">
            </a>
        </div>

        @include('auth.partials.copy')
    </form>
@endsection
Okay, that's pretty much it. You can now serve and run your application in your browser: http://127.0.0.1:8000/login
I hope it helps. Don't forget to share this with your friends. Thank you for reading.


Leave a Comment