Create Table using Laravel 9 Migration Artisan Command?
Guide on how to create a table using the Laravel migration artisan command. Laravel migration helps us to modify the database and update it without any mess.
In this post, I will show you a guide on how to create a table using the Laravel migration artisan command. If your using Laravel it allows us to create table easily using the artisan command and help us to modify the database and stay up to date without any mess.
If you are new to Laravel and want to know how to do it for example this post is for you. Just follow the guide below on how to create a table using migrations in Laravel 4, 5, 6, 7, 8, and 9.
Step 1: Create Laravel Migration
Now let's create our first Laravel migration in this example we will create a simple products table. I assume that you already know how to run the artisan command in Laravel 4, 5, 6, 7, 8, and 9.
php artisan make:migration create_products_tableAfter you run the above command it will generate a migration file:
database/migrations/2021_11_20_022433_create_products_table.php see below-generated code:
<?php

use Illuminate\Database\Migrations\Migration;
use Illuminate\Database\Schema\Blueprint;
use Illuminate\Support\Facades\Schema;

class CreateProductsTable extends Migration
{
    /**
     * Run the migrations.
     *
     * @return void
     */
    public function up()
    {
        Schema::create('products', function (Blueprint $table) {
            $table->id();
            $table->timestamps();
        });
    }

    /**
     * Reverse the migrations.
     *
     * @return void
     */
    public function down()
    {
        Schema::dropIfExists('products');
    }
}
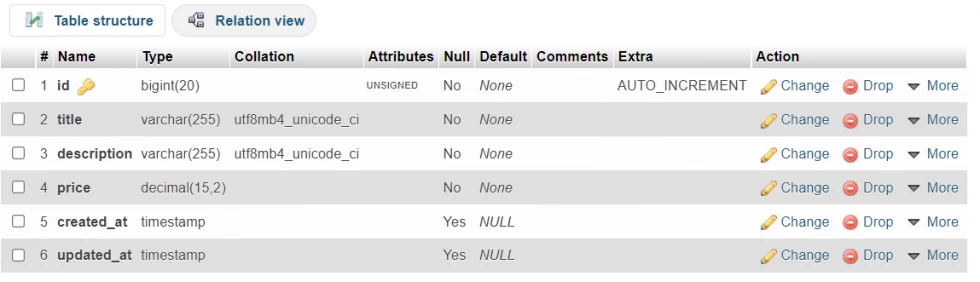
Now, let's add our basic columns for the products table. Here is the updated code:
<?php

use Illuminate\Database\Migrations\Migration;
use Illuminate\Database\Schema\Blueprint;
use Illuminate\Support\Facades\Schema;

class CreateProductsTable extends Migration
{
    /**
     * Run the migrations.
     *
     * @return void
     */
    public function up()
    {
        Schema::create('products', function (Blueprint $table) {
            $table->id();
            $table->string('title');
            $table->string('description');
            $table->decimal('price', 15, 2);
            $table->timestamps();
        });
    }

    /**
     * Reverse the migrations.
     *
     * @return void
     */
    public function down()
    {
        Schema::dropIfExists('products');
    }
}
Step 2: Run Laravel Migration
Then now let's run the command to migrate our newly created migration. Run the following command below:
php artisan migrateAfter you run the above command let's check to our phpmyadmin area.
Laravel Migration Command Options
Now, let's learn basic Laravel migration command options.
Create a Migration with Table:
php artisan make:migration create_products_table --table=productsRun Specific Migration:
php artisan migrate --path=/database/migrations/2021_11_20_022433_create_products_table.phpMigration Rollback:
php artisan migrate:rollbackTo know more about Laravel migrations visit here.
I hope it helps :)


Leave a Comment