How To Implement Laravel 9 Email Verification?
I will show you how to implement email verification for your Laravel 8, and 9 projects. After a user registers to your application we need to verify it via email.
In this post, I will show you how to implement email verification for your Laravel 8, and 9 projects. Since we have authentication already we need to verify the given email is active.
I will give you a step-by-step so that it will be easier to you to follow and implement to Laravel project.
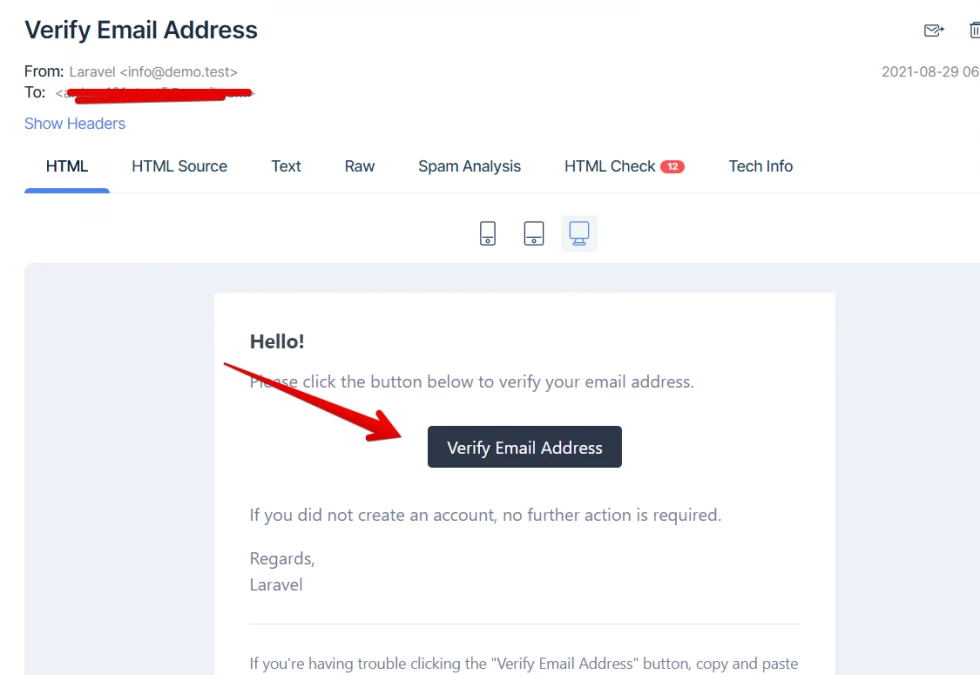
If you click the Verify Email Address your account will get verified.
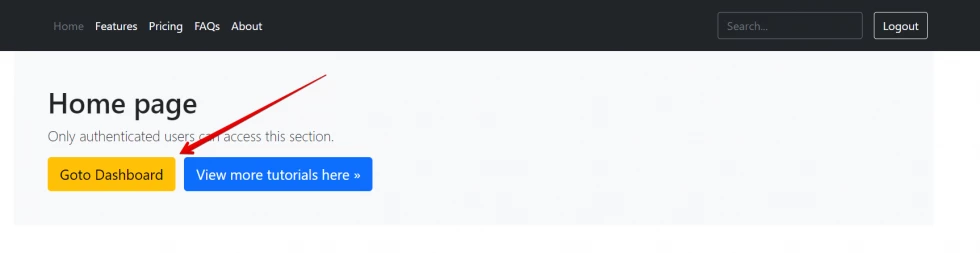
If you click the Goto Dashboard button it will be redirected to the below sample screenshot if your account has not yet been verified.

So, we will continue to our tutorial to have this functionality.
I assumed that you have an installed Laravel 8 Project and you have the authentication already. If no please visit this tutorial.
Step 1: Run composer to your command
composer require laravel/uiStep 2: Add verification routes
Add the following routes to your routes/web.php:
Route::group(['middleware' => ['auth']], function() {
    .
    .
    .
    /**
    * Verification Routes
    */
    Route::get('/email/verify', 'VerificationController@show')->name('verification.notice');
    Route::get('/email/verify/{id}/{hash}', 'VerificationController@verify')->name('verification.verify')->middleware(['signed']);
    Route::post('/email/resend', 'VerificationController@resend')->name('verification.resend');
    .
    .
    .
});
Step 3: Add verification controller
Let's create our VerificationController and run the following command below:
php artisan make:controller VerificationControllerThen copy and paste the code below.
<?php

namespace App\Http\Controllers;

use Illuminate\Http\Request;
use Illuminate\Foundation\Auth\RedirectsUsers;
use Illuminate\Foundation\Auth\VerifiesEmails;

class VerificationController extends Controller
{
    /*
    |--------------------------------------------------------------------------
    | Email Verification Controller
    |--------------------------------------------------------------------------
    |
    | This controller is responsible for handling email verification for any
    | user that recently registered with the application. Emails may also
    | be re-sent if the user didn't receive the original email message.
    |
    */

    use VerifiesEmails, RedirectsUsers;

    /**
     * Where to redirect users after verification.
     *
     * @var string
     */
    protected $redirectTo = '/';

    /**
     * Create a new controller instance.
     *
     * @return void
     */
    public function __construct()
    {
        $this->middleware('auth');
        $this->middleware('signed')->only('verify');
        $this->middleware('throttle:6,1')->only('verify', 'resend');
    }

    /**
     * Show the email verification notice.
     *
     * @param  \Illuminate\Http\Request  $request
     * @return \Illuminate\Http\RedirectResponse|\Illuminate\View\View
     */
    public function show(Request $request)
    {
        return $request->user()->hasVerifiedEmail()
                        ? redirect($this->redirectPath())
                        : view('verification.notice', [
                            'pageTitle' => __('Account Verification')
                        ]);
    }
}
Step 4: Implement MustVerifyEmail to User Model
See the following codes below:
<?php

namespace App\Models;

use Laravel\Sanctum\HasApiTokens;
use Illuminate\Notifications\Notifiable;
use Illuminate\Contracts\Auth\MustVerifyEmail;
use Illuminate\Database\Eloquent\Factories\HasFactory;
use Illuminate\Foundation\Auth\User as Authenticatable;

class User extends Authenticatable implements MustVerifyEmail
{
    use HasApiTokens, HasFactory, Notifiable;
As you can see I implement MustVerifyEmail to the User model.
Step 5: Add verification views
Then add folder "verification" to the resources/views directory. And add a file named notice.blade.php then add the following code.
@extends('layouts.app-master')

@section('content')
    <div class="bg-light p-5 rounded">
        <h1>Dashboard</h1>

        @if (session('resent'))
            <div class="alert alert-success" role="alert">
                A fresh verification link has been sent to your email address.
            </div>
        @endif

        Before proceeding, please check your email for a verification link. If you did not receive the email,
        <form action="{{ route('verification.resend') }}" method="POST" class="d-inline">
            @csrf
            <button type="submit" class="d-inline btn btn-link p-0">
                click here to request another
            </button>.
        </form>
    </div>
@endsection
Step 6: Add event to registration
Then add this line event(new Registered($user)); to your register method. In this example, you can see it inside app/Http/Controllers/RegisterController.php.
See below code:
/**
* Handle account registration request
*
* @param RegisterRequest $request
*
* @return \Illuminate\Http\Response
*/
public function register(RegisterRequest $request)
{
   $user = User::create($request->validated());

   event(new Registered($user));

   auth()->login($user);

   return redirect('/')->with('success', "Account successfully registered.");
}
Step 7: Register event and listener
In Laravel 8 installation the below code is already added but you need to double-check if added in $listen property so that we don't have a problem with it.
Filename: App\Providers\EventServiceProvider.php
/**
* The event listener mappings for the application.
*
* @var array
*/
protected $listen = [
    Registered::class => [
        SendEmailVerificationNotification::class,
    ],
];
Step 8: Register with mailtrap
Then register to mailtrap for sending test emails. And get credentials inside Demo Inbox.
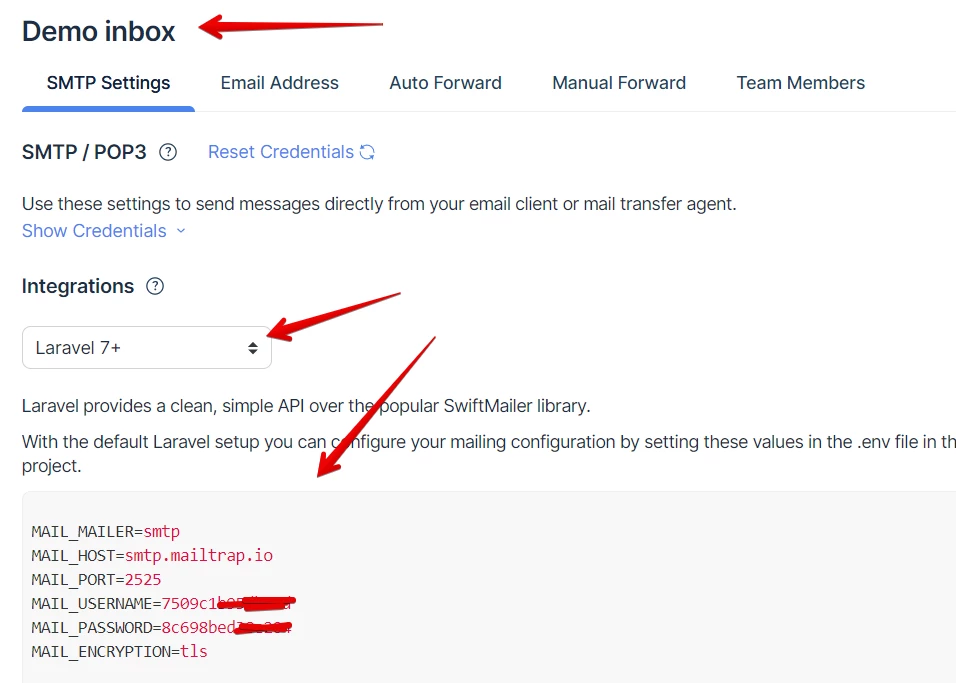
Then update it to your .env file.
Step 9: Create Dashboard Controller
Now we will create a DashboardController and we will secure it with verified middleware later. Run the command below:
php artisan make:controller DashboardControllerThen copy and paste the code below:
<?php

namespace App\Http\Controllers;

use Illuminate\Http\Request;

class DashboardController extends Controller
{
    public function index()
    {
        return view('dashboard.index');
    }
}
Step 10: Add route for dashboard
Next, we will create a route for our dashboard and it must be protected with middleware called verified this is a default middleware from Laravel that only verified accounts can access.
//only authenticated can access this group
Route::group(['middleware' => ['auth']], function() {
    //only verified account can access with this group
    Route::group(['middleware' => ['verified']], function() {
            /**
             * Dashboard Routes
             */
            Route::get('/dashboard', 'DashboardController@index')->name('dashboard.index');
    });
});
Step 11: Create dashboard views
Navigate to resources/views directory then create a folder "dashboard" then create a blade file "index.blade.php" and copy and paste the following code below:
@extends('layouts.app-master')

@section('content')
    <div class="bg-light p-5 rounded">
        <h1>Dashboard</h1>
        <p class="lead">Only authenticated users can access this page.</p>
    </div>
@endsection
Let's add the "Go to Dashboard" button to our home page so that it will be clickable and redirected to the dashboard.
If you followed my previous tutorial about authentication I have a home folder inside resources. Then we have the index.blade.php file. We will update it with the code below:
@extends('layouts.app-master')
@section('content')
<div class="bg-light p-5 rounded">
@auth
<h1>Home page</h1>
<p class="lead">Only authenticated users can access this section.</p>
<a href="{{ route('dashboard.index') }}" class="btn btn-lg btn-warning me-2">Goto Dashboard</a>
<a class="btn btn-lg btn-primary" href="https://codeanddeploy.com" role="button">View more tutorials here »</a>
@endauth
@guest
<h1>Homepage</h1>
<p class="lead">Your viewing the home page. Please login to view the restricted data.</p>
@endguest
</div>
@endsection
That's pretty much it. I hope this short tutorial may help you.
Thank you for reading Happy coding :)


Leave a Comment