Laravel 9 Email Notification Example
In this post, I will show you an example of how to implement Laravel 9 email notifications. Email notification is one of the most important functions to implement.
In this post, I will show you an example of how to implement Laravel 8, and 9 email notifications. We know that email notifications are one of the most important functionality to implement in our web application as well as in the Laravel framework. Laravel provides an easy way of sending an email using the Notification class that is easily sent to any delivery channels such as email, SMS, and Slack. The advantage of using Notification on Laravel is that this is already associated with the specified user we just put a parameter of the User object value then the class will handle the sending.
In Laravel notification, we can also save it to our database so that easily display in our web interface.
In this Laravel notification example, we are using email to notify the User of the project assigned.
Kindly follow the following below to learn about Laravel email notifications.
Step 1: Laravel Installation
If you don't have a Laravel 8 install in your local just run the following command below:
composer create-project --prefer-dist laravel/laravel laravel-email-notificationStep 2: Database Configuration
If your Laravel project is fresh then you need to update your database credentials. Just open the .env file in your Laravel 9 project.
.env
DB_CONNECTION=mysql
DB_HOST=127.0.0.1
DB_PORT=3306
DB_DATABASE=your_database_name_here
DB_USERNAME=your_database_username_here
DB_PASSWORD=your_database_password_here
Step 3: Migration Setup
Here we need to generate first the notifications table before running the migrations. Kindly run the following command:
php artisan notifications:tablephp artisan migrateThen once done let's create a seeder for our user. Run the following command:
php artisan make:seeder CreateUsersSeederOnce our seeder is generated kindly to the database/seeders directory. Open the CreateUsersSeeder.php and you will see the following code:
<?php

namespace Database\Seeders;

use App\Models\User;
use Illuminate\Database\Seeder;

class CreateUsersSeeder extends Seeder
{
    /**
     * Run the database seeds.
     *
     * @return void
     */
    public function run()
    {
        User::create([
            'name' => 'Juan',
            'email' => 'email@gmail.com',
            'password' => bcrypt('password')
        ]);
    }
}
Then run the following command:
php artisan db:seed --class=CreateUsersSeederLearn more about Laravel seeder here.
Step 4: Making Laravel Email Notification
Now, let's generate our Laravel email notification example we will name this as EmailNotification. Run the following command to do this.
php artisan make:notification EmailNotificationOnce done, navigate App/Notifications and open EmailNotification.php then edit it. See the below example:
<?php

namespace App\Notifications;

use Illuminate\Bus\Queueable;
use Illuminate\Contracts\Queue\ShouldQueue;
use Illuminate\Notifications\Messages\MailMessage;
use Illuminate\Notifications\Notification;

class EmailNotification extends Notification
{
    use Queueable;

    /**
     * @var array $project
     */
    protected $project;

    /**
     * Create a new notification instance.
     *
     * @return void
     */
    public function __construct($project)
    {
        $this->project = $project;
    }

    /**
     * Get the notification's delivery channels.
     *
     * @param  mixed  $notifiable
     * @return array
     */
    public function via($notifiable)
    {
        return ['mail','database'];
    }

    /**
     * Get the mail representation of the notification.
     *
     * @param  mixed  $notifiable
     * @return \Illuminate\Notifications\Messages\MailMessage
     */
    public function toMail($notifiable)
    {
        return (new MailMessage)
                    ->greeting($this->project['greeting'])
                    ->line($this->project['body'])
                    ->action($this->project['actionText'], $this->project['actionURL'])
                    ->line($this->project['thanks']);
    }

    /**
     * Get the array representation of the notification.
     *
     * @param  mixed  $notifiable
     * @return array
     */
    public function toDatabase($notifiable)
    {
        return [
            'project_id' => $this->project['id']
        ];
    }

    /**
     * Get the array representation of the notification.
     *
     * @param  mixed  $notifiable
     * @return array
     */
    public function toArray($notifiable)
    {
        return [
            //
        ];
    }
}
Step 4: Setting up Routes
In my example, I will create manually my crud routes. Just open the "routes/web.php" file and add the following routes.
<?php

use Illuminate\Support\Facades\Route;

/*
|--------------------------------------------------------------------------
| Web Routes
|--------------------------------------------------------------------------
|
| Here is where you can register web routes for your application. These
| routes are loaded by the RouteServiceProvider within a group which
| contains the "web" middleware group. Now create something great!
|
*/

Route::get('/', function () {
    return view('welcome');
});

Route::get('/send', '\App\Http\Controllers\HomeController@send')->name('home.send');
Step 5: Setting Up Controller
In this section, we will add our email notification in our HomeController as we set in our routes. See below the complete code of our controller:
<?php

namespace App\Http\Controllers;

use Notification;
use App\Models\User;
use Illuminate\Http\Request;
use App\Notifications\EmailNotification;

class HomeController extends Controller
{
    public function send()
    {
    	$user = User::first();

        $project = [
            'greeting' => 'Hi '.$user->name.',',
            'body' => 'This is the project assigned to you.',
            'thanks' => 'Thank you this is from codeanddeploy.com',
            'actionText' => 'View Project',
            'actionURL' => url('/'),
            'id' => 57
        ];

        Notification::send($user, new EmailNotification($project));

        dd('Notification sent!');
    }
}
Now our code is ready for sending notifications to our users. You can test it now by running the serve command:
php artisan serveThen run the URL below to your browser to send an email notification to your user.
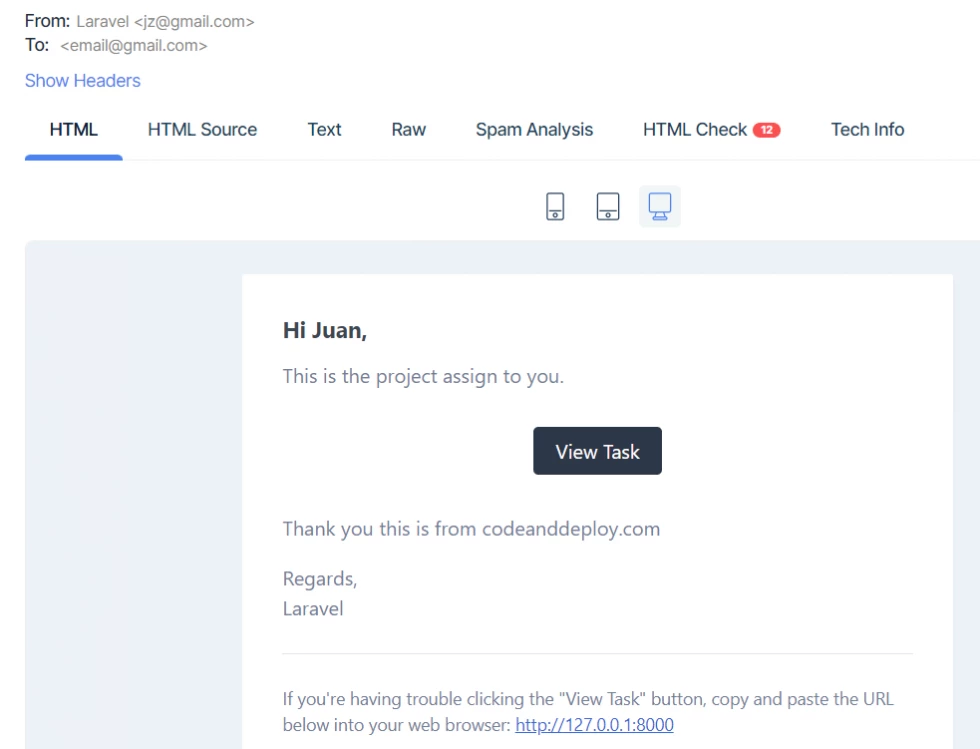
http://127.0.0.1:8000/sendNow Laravel sent an email notification. See the below output:
Laravel also provides a way of sending option.
$user->notify(new EmailNotification($project));And you can get the user notifications by using the following code.
dd($user->notifications);I hope it helps. Thank you for visiting.


Leave a Comment