TinyMCE: Add Custom/Content CSS Example
In my previous posts, I have several tutorials of TinyMCE. Now if you want a custom style inside to your WYSIWYG Editor. Usually, I apply a custom CSS style if I have a custom element like insert my own element and adding some styles. You can apply it to your custom dialog. See here if how to add a custom dialog box on
In my previous posts, I have several tutorials of TinyMCE. Now if you want a custom style inside to your WYSIWYG Editor. Usually, I apply a custom CSS style if I have a custom element like insert my own element and adding some styles. You can apply it to your custom dialog. See here if how to add a custom dialog box on TinyMCE.
Sample CSS code:
Filename: custom_css_tinymce.css
.color-red {
	color: red;
}
Code Adding Custom CSS:
Add the below code to your TinyMCE configuration.
content_css: ["/assets/css/custom_css_tinymce.css"],You must run your project with the custom local domain if you working on your local to work this content CSS URL.
See the complete source code below:
<!DOCTYPE html>
<html>
<head>
<meta charset="utf-8">
<title>Basic on TinyMCE with Custom Dialog Box & Select Box</title>
<link rel="stylesheet" href="https://cdn.jsdelivr.net/npm/bootstrap@5.0.2/dist/css/bootstrap.min.css">
<script src="https://ajax.googleapis.com/ajax/libs/jquery/3.5.1/jquery.min.js"></script>
<script type="text/javascript" src="assets/plugins/tinymce/js/tinymce.min.js"></script>
<script type="text/javascript">
tinymce.init({
selector: 'textarea#tinymce',
plugins: [
"advlist autolink lists link image charmap print preview anchor",
"searchreplace visualblocks code fullscreen",
"insertdatetime media table paste codesample"
],
toolbar:
"undo redo | fontselect styleselect fontsizeselect | bold italic | alignleft aligncenter alignright alignjustify | bullist numlist outdent indent | link image | codesample action section button | custom_dialog",
content_css: ["/assets/css/custom_css_tinymce.css"],
font_formats:"Segoe UI=Segoe UI;",
fontsize_formats: "8px 9px 10px 11px 12px 14px 16px 18px 20px 22px 24px 26px 28px 30px 32px 34px 36px 38px 40px 42px 44px 46px 48px 50px 52px 54px 56px 58px 60px 62px 64px 66px 68px 70px 72px 74px 76px 78px 80px 82px 84px 86px 88px 90px 92px 94px 94px 96px",
height: 600,
setup: function (editor) {
editor.ui.registry.addButton('custom_dialog', {
text: 'Open Custom Dialog',
onAction: function() {
// Open a Dialog
editor.windowManager.open({
title: 'Custom dialog box',
body: {
type: 'panel',
items: [{
type: 'input',
name: 'custom_data',
label: 'Custom data',
flex: true
},{
type: 'selectbox',
name: 'selected_style',
label: 'Select style',
items: [
{text: 'Primary', value: 'primay style'},
{text: 'Success', value: 'success style'},
{text: 'Error', value: 'error style'}
],
flex: true
}]
},
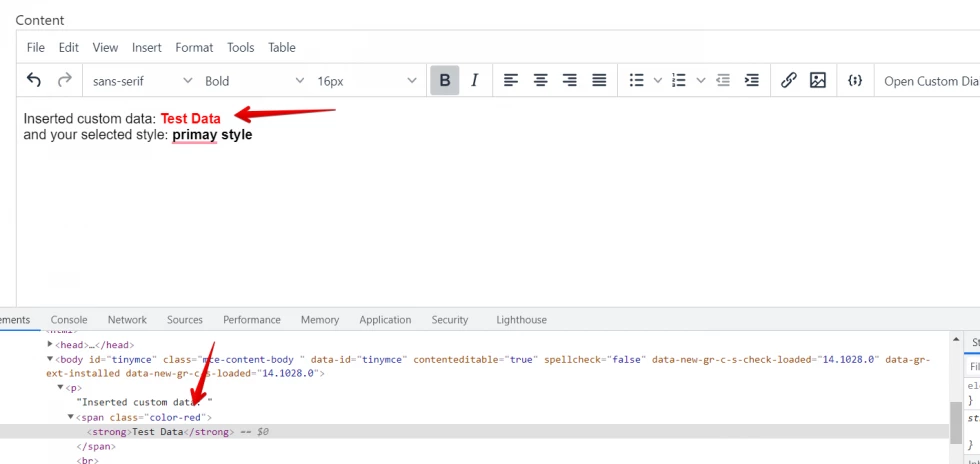
onSubmit: function (api) {
// insert markup
editor.insertContent('Inserted custom data: <span class="color-red"><b>' + api.getData().custom_data + '</b></span> <br>and your selected style: <b>' + api.getData().selected_style) + '</b>';
// close the dialog
api.close();
},
buttons: [
{
text: 'Close',
type: 'cancel',
onclick: 'close'
},
{
text: 'Insert',
type: 'submit',
primary: true,
enabled: false
}
]
});
}
});
}
});
</script>
</head>
<body>
<div class="container mt-5">
<form method="post">
<div class="form-group">
<label>Title</label>
<input type="text" name="title" class="form-control">
</div>
<div class="form-group mt-4">
<label>Content</label>
<textarea id="tinymce"></textarea>
</div>
<button class="btn btn-primary mt-4">Submit</button>
</form>
</div>
</body>
</html>I hope it helps. Thank you for reading :)


Leave a Comment