Step-by-Step Tutorial: Implementing Yajra Datatables in Laravel 10
In this tutorial, we'll explore Yajra Datatables in Laravel, providing you with essential methods and examples to create and display your own data tables. Whether you're new to Laravel or an experienced developer, this tutorial will help you unlock the potential of Yajra Datatables.

As a web developer, you know that displaying data to users is crucial. But in Laravel, creating dynamic and interactive tables with large amounts of data can be overwhelming. Luckily, Yajra Datatables is a third-party package that can make this process much easier.
In this tutorial, we'll explore Yajra Datatables in Laravel, providing you with essential methods and examples to create and display your own data tables. Whether you're new to Laravel or an experienced developer, this tutorial will help you unlock the potential of Yajra Datatables.
One of the most significant advantages of Yajra Datatables is its ability to handle large datasets with ease. It can paginate and filter through thousands of records without slowing down your page's load time, which is incredibly valuable for projects with a lot of data.
We'll start with the basics, teaching you the essential methods needed to create a basic data table. Then, we'll move on to more advanced topics, such as creating an AJAX example with Laravel Datatables and using Bootstrap Datatable in Laravel.
By the end of this tutorial, you'll have a firm grasp of Yajra Datatables in Laravel. You'll be empowered to create dynamic and interactive tables that display data efficiently and effectively. Whether you're creating an eCommerce store, a CRM system, or anything in between, Yajra Datatables will be a valuable tool in your toolkit.
Let's dive into the world of Yajra Datatables in Laravel together!
Step 1: Install the Laravel App
First things first! Our initial step is to install a new Laravel application. You can get this done by running a simple Artisan command mentioned below. This command is like a magic spell that will install the Laravel framework in no time!
composer create-project laravel/laravel laravel-yajra-datatables --prefer-distLet's dive right into the project:
cd laravel-yajra-datatablesStep 2: Install Yajra Datatable Package
Have you heard of Yajra Datatables? It's a library that uses the jQuery DataTables API for Laravel 4, 5, 6, 7, 8, 9, and 10. This plugin makes it easy to handle the server-side operations of the DataTables jQuery plugin using AJAX with the Eloquent ORM, Fluent Query Builder, or Collection.
To install the Yajra DataTable plugin in Laravel, you can use the following command.
composer require yajra/laravel-datatables-oracleFurthermore, you need to expand the foundational service of the package by adding the datatable service provider in the 'providers' section and an alias in the config/app.php file.
.....
.....
'providers' => [
	....
	....
	Yajra\DataTables\DataTablesServiceProvider::class,
]
'aliases' => [
	....
	....
	'DataTables' => Yajra\DataTables\Facades\DataTables::class,
]
.....
.....
Run the vendor publish command to proceed. Note that this step is not mandatory and can be skipped if needed.
php artisan vendor:publish --provider="Yajra\DataTables\DataTablesServiceProvider"Step 3: Set Up the Model and Migrations
Use this command to create a model that stores the structure of a database table.
php artisan make:model Blog -mAfter that it will generate a file with following database/migrations/timestamp_create_blogs_table.php then add the below code:
public function up()
{
    Schema::create('blogs', function (Blueprint $table) {
        $table->id();
        $table->string('title');
        $table->string('description');
        $table->text('content');
        $table->timestamps();
    });
}
Then open the app/Models/Blog.php add the following code below:
<?php

namespace App\Models;

use Illuminate\Database\Eloquent\Factories\HasFactory;
use Illuminate\Database\Eloquent\Model;

class Blog extends Model
{
    use HasFactory;

    protected $fillable = [
        'title',
        'description',
        'content'
    ];
}
Then run the following command to migrate it:
php artisan migrateStep 4: To Test Yajra Datatables in Laravel 10 We Need to Add Dummy Records
In order to demonstrate the power of Yajra DataTables in Laravel 10, we need to generate some dummy data. But don't worry, we can make use of a built-in plugin called Faker to create fake data and store it in the database.
To generate fake records we need to open database/seeders/DatabaseSeeder.php file and add the following code:
<?php

namespace Database\Seeders;

use Faker\Factory as Faker;
use Illuminate\Database\Seeder;
use Illuminate\Support\Facades\DB;
// use Illuminate\Database\Console\Seeds\WithoutModelEvents;

class DatabaseSeeder extends Seeder
{
    /**
     * Seed the application's database.
     *
     * @return void
     */
    public function run()
    {
        $faker = Faker::create();

        for ($i = 0; $i < 200; $i++) {
            DB::table('blogs')->insert([
                'title' => $faker->sentence($nbWords = 6, $variableNbWords = true),
                'description' => $faker->paragraph($nbSentences = 2, $variableNbSentences = true),
                'content' => $faker->text($maxNbChars = 500),
            ]);
        }
    }
}
Then run the following command to generate the dummy records:
php artisan db:seedStep 5: Create a Controller
Now let's create a controller for our Blog model. Let's call it BlogController which handles the core logic request to get the data from the database and show its user end.
To create a controller run the following command:
php artisan make:controller BlogControllerOpen the file app/Http/Controllers/BlogController.php and add the following code:
<?php

namespace App\Http\Controllers;

use Yajra\DataTables\Facades\Datatables;
use App\Models\Blog;
use Illuminate\Http\Request;

class BlogController extends Controller
{
    /**
     * Display a listing of the resource.
     *
     * @return \Illuminate\Http\Response
     */
    public function index(Request $request)
    {
        if ($request->ajax()) {
            $data = Blog::select('*');
            return Datatables::of($data)
                ->addIndexColumn()
                ->addColumn('action', function($row){
                    $actionBtn = '<a href="javascript:void(0)" class="edit btn btn-success btn-sm">Edit</a> <a href="javascript:void(0)" class="delete btn btn-danger btn-sm">Delete</a>';
                    return $actionBtn;
                })
                ->rawColumns(['action'])
                ->make(true);
        }

        return view('welcome');
    }
}
Step 6: Create Routes
Now, let's create routes to display our datable in our view for the Laravel application.
Open routes/web.php and add the following code:
<?php
use Illuminate\Support\Facades\Route;
use App\Http\Controllers\BlogController;
/*
|--------------------------------------------------------------------------
| Web Routes
|--------------------------------------------------------------------------
|
| Here is where you can register web routes for your application. These
| routes are loaded by the RouteServiceProvider within a group which
| contains the "web" middleware group. Now create something great!
|
*/
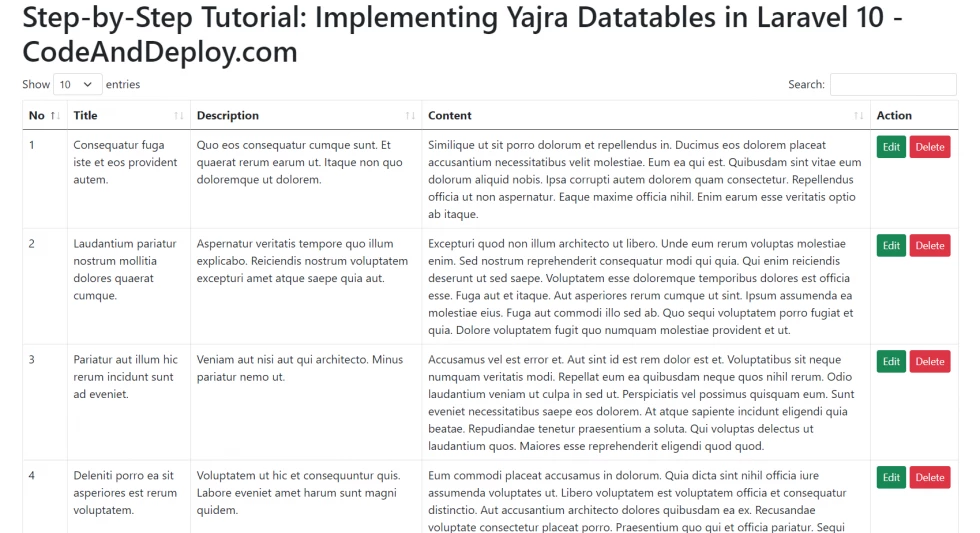
Route::get('blogs', [BlogController::class, 'index'])->name('blogs.index');Step 7: Displaying Records with Laravel Yajra Datatables
Congratulations! We've finally arrived at the end of our Laravel Yajra Datatables tutorial. But before we wrap things up, we need to create a welcome.blade.php file. Now, creating a visually stunning table can be a bit challenging, especially if you're not familiar with HTML and CSS. Thankfully, this is where Bootstrap comes in handy. Bootstrap was specifically designed to make the process of designing beautiful tables a breeze. So, let's dive in and create a stunning table using Bootstrap!
Open resources/views/welcome.blade.php file and place the following code:
<!DOCTYPE html>
<html>
<head>
    <title>Step-by-Step Tutorial: Implementing Yajra Datatables in Laravel 10 - CodeAndDeploy.com</title>
    <meta name="csrf-token" content="{{ csrf_token() }}">
    <link href="https://cdnjs.cloudflare.com/ajax/libs/twitter-bootstrap/5.0.1/css/bootstrap.min.css" rel="stylesheet">
    <link href="https://cdn.datatables.net/1.11.4/css/dataTables.bootstrap5.min.css" rel="stylesheet">
    <script src="https://code.jquery.com/jquery-3.5.1.js"></script>
    <script src="https://cdnjs.cloudflare.com/ajax/libs/jquery-validate/1.19.0/jquery.validate.js"></script>
    <script src="https://cdn.datatables.net/1.11.4/js/jquery.dataTables.min.js"></script>
    <script src="https://cdn.jsdelivr.net/npm/bootstrap@5.0.2/dist/js/bootstrap.bundle.min.js" integrity="sha384-MrcW6ZMFYlzcLA8Nl+NtUVF0sA7MsXsP1UyJoMp4YLEuNSfAP+JcXn/tWtIaxVXM" crossorigin="anonymous"></script>
    <script src="https://cdn.datatables.net/1.11.4/js/dataTables.bootstrap5.min.js"></script>
</head>
<body>

<div class="container">
    <h1>Step-by-Step Tutorial: Implementing Yajra Datatables in Laravel 10 - CodeAndDeploy.com</h1>
    <table class="table table-bordered data-table">
        <thead>
            <tr>
                <th>No</th>
                <th>Title</th>
                <th>Description</th>
                <th>Content</th>
                <th width="105px">Action</th>
            </tr>
        </thead>
        <tbody>
        </tbody>
    </table>
</div>

</body>

<script type="text/javascript">
  $(function () {

    var table = $('.data-table').DataTable({
        processing: true,
        serverSide: true,
        ajax: "{{ route('blogs.index') }}",
        columns: [
            {data: 'id', name: 'id'},
            {data: 'title', name: 'title'},
            {data: 'description', name: 'description'},
            {data: 'content', name: 'content'},
            {data: 'action', name: 'action', orderable: false, searchable: false},
        ]
    });

  });
</script>
</html>
Let me break it down for you! What I did above defined the DataTable() method and set up an AJAX request to fetch data from the server. This data includes the blog's title, description, and content which are all displayed beautifully thanks to the Yajra DataTable package.
Furthermore, we've made sure to set the orderable and searchable properties to true. This means you can effortlessly search through your data and accomplish your programming goals with ease. So, sit back and enjoy the smooth sailing!
It's time to put our hard work to the test! Run the following command and take a peek at our progress on the browser. Let's see what we've accomplished so far!
php artisan serveNow let's see the result below:
That's it. I hope it heps.


Leave a Comment