TinyMCE Custom Dialog Box Example
In this post, I'm sharing how to add a custom dialog box in the TinyMCE WYSIWYG HTML editor. Adding a dialog box will able you to input dynamic records or data to your content editor using TinyMCE. Now I will show you how to do it with simple steps. For us to go further I have a tutorial on basic how-to install TinyMCE
In this post, I'm sharing how to add a custom dialog box in the TinyMCE WYSIWYG HTML editor. Adding a dialog box will able you to input dynamic records or data to your content editor using TinyMCE. Now I will show you how to do it with simple steps. For us to go further I have a tutorial on basic how-to install TinyMCE just visit if you need it.

Okay, let's continue.
Using editor.ui.registry on TinyMCE we are able to add our custom dialog box with the form with specified inputs.
Setting up TinyMCE dialog box
Add this code below to your TinyMCE configuration.
setup: function (editor) {

}
Add TinyMCE Registry
Then add the code below inside the setup function:
editor.ui.registry.addButton('custom_dialog', {
text: 'Open Custom Dialog',
onAction: function() {
// Open a Dialog
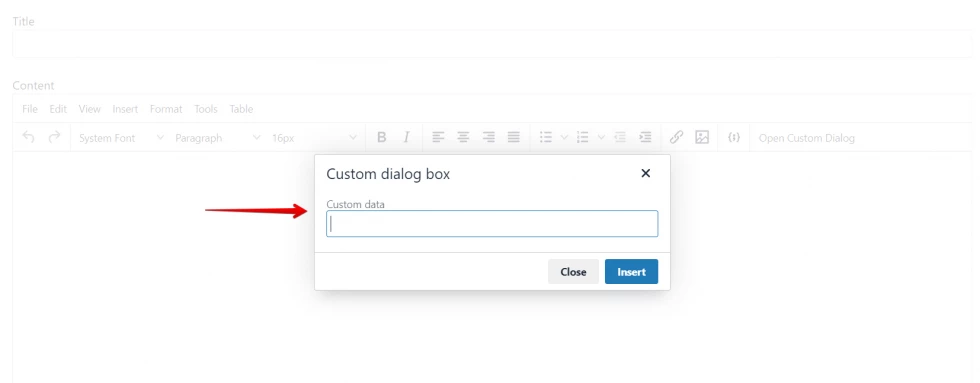
editor.windowManager.open({
title: 'Custom dialog box',
body: {
type: 'panel',
items: [{
type: 'input',
name: 'custom_data',
label: 'Custom data',
flex: true
}]
},
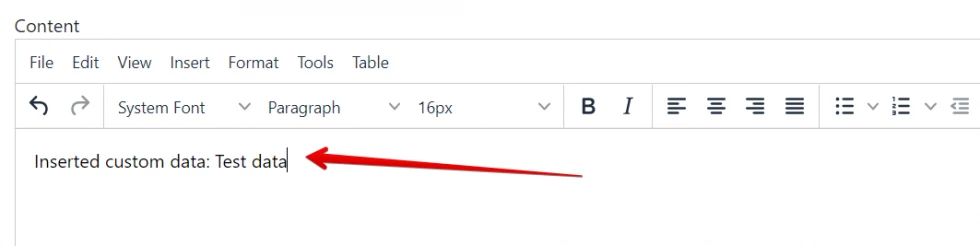
onSubmit: function (api) {
// insert markup
editor.insertContent('Inserted custom data: ' + api.getData().custom_data);
// close the dialog
api.close();
},
buttons: [
{
text: 'Close',
type: 'cancel',
onclick: 'close'
},
{
text: 'Insert',
type: 'submit',
primary: true,
enabled: false
}
]
});
}
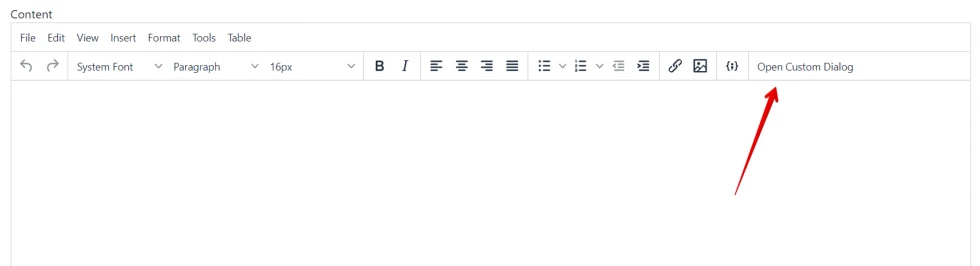
});As you can see above code we have custom_dialog that is our dialog name we will call it to our toolbar settings. See the below example:
Insert Custom Dialog in Toolbar
Toolbar setting without custom_dialog:
toolbar:"undo redo | fontselect styleselect fontsizeselect | bold italic | alignleft aligncenter alignright alignjustify | bullist numlist outdent indent | link image | codesample action section button",Toolbar settings with custom_dialog:
toolbar: "undo redo | fontselect styleselect fontsizeselect | bold italic | alignleft aligncenter alignright alignjustify | bullist numlist outdent indent | link image | codesample action section button | custom_dialog",As you can see above we added "| custom_dialog" once added it will display the "Open Custom Dialog" to your TinyMCE editor toolbar.
See the complete setup below:
setup: function (editor) {
    editor.ui.registry.addButton('custom_dialog', {
        text: 'Open Custom Dialog',
        onAction: function() {
            // Open a Dialog
            editor.windowManager.open({
                title: 'Custom dialog box',
                body: {
                    type: 'panel',
                    items: [{
                        type: 'input',
                        name: 'custom_data',
                        label: 'Custom data',
                        flex: true
                    }]
                },
                onSubmit: function (api) {
                    // insert markup
                    editor.insertContent('Inserted custom data: ' + api.getData().custom_data);

                    // close the dialog
                    api.close();
                },
                buttons: [
                    {
                        text: 'Close',
                        type: 'cancel',
                        onclick: 'close'
                    },
                    {
                        text: 'Insert',
                        type: 'submit',
                        primary: true,
                        enabled: false
                    }
                ]
            });
        }
    });
}
Complete TinyMCE Configuration
See below the complete TinyMCE configuration settings below:
tinymce.init({
    selector: 'textarea#tinymce',
    plugins: [
        "advlist autolink lists link image charmap print preview anchor",
        "searchreplace visualblocks code fullscreen",
        "insertdatetime media table paste codesample"
    ],
    toolbar:
        "undo redo | fontselect styleselect fontsizeselect | bold italic | alignleft aligncenter alignright alignjustify | bullist numlist outdent indent | link image | codesample action section button | custom_dialog",
    font_formats:"Segoe UI=Segoe UI;",
    fontsize_formats: "8px 9px 10px 11px 12px 14px 16px 18px 20px 22px 24px 26px 28px 30px 32px 34px 36px 38px 40px 42px 44px 46px 48px 50px 52px 54px 56px 58px 60px 62px 64px 66px 68px 70px 72px 74px 76px 78px 80px 82px 84px 86px 88px 90px 92px 94px 94px 96px",
    height: 600,
    setup: function (editor) {
        editor.ui.registry.addButton('custom_dialog', {
            text: 'Open Custom Dialog',
            onAction: function() {
                // Open a Dialog
                editor.windowManager.open({
                    title: 'Custom dialog box',
                    body: {
                        type: 'panel',
                        items: [{
                            type: 'input',
                            name: 'custom_data',
                            label: 'Custom data',
                            flex: true
                        }]
                    },
                    onSubmit: function (api) {
                        // insert markup
                        editor.insertContent('Inserted custom data: ' + api.getData().custom_data);

                        // close the dialog
                        api.close();
                    },
                    buttons: [
                        {
                            text: 'Close',
                            type: 'cancel',
                            onclick: 'close'
                        },
                        {
                            text: 'Insert',
                            type: 'submit',
                            primary: true,
                            enabled: false
                        }
                    ]
                });
            }
        });
    }
});
Complete TinyMCE Sourcecode
<!DOCTYPE html>
<html>
<head>
	<meta charset="utf-8">
	<title>Basic on TinyMCE with Custom Dialog Box</title>

	<link rel="stylesheet" href="https://cdn.jsdelivr.net/npm/bootstrap@5.0.2/dist/css/bootstrap.min.css">
    <script src="https://ajax.googleapis.com/ajax/libs/jquery/3.5.1/jquery.min.js"></script>
	<script type="text/javascript" src="assets/plugins/tinymce/js/tinymce.min.js"></script>

	<script type="text/javascript">
		tinymce.init({
	        selector: 'textarea#tinymce',
	        plugins: [
                "advlist autolink lists link image charmap print preview anchor",
                "searchreplace visualblocks code fullscreen",
                "insertdatetime media table paste codesample"
            ],
            toolbar:
                "undo redo | fontselect styleselect fontsizeselect | bold italic | alignleft aligncenter alignright alignjustify | bullist numlist outdent indent | link image | codesample action section button | custom_dialog",
	        font_formats:"Segoe UI=Segoe UI;",
	        fontsize_formats: "8px 9px 10px 11px 12px 14px 16px 18px 20px 22px 24px 26px 28px 30px 32px 34px 36px 38px 40px 42px 44px 46px 48px 50px 52px 54px 56px 58px 60px 62px 64px 66px 68px 70px 72px 74px 76px 78px 80px 82px 84px 86px 88px 90px 92px 94px 94px 96px",
	        height: 600,
	        setup: function (editor) {
	            editor.ui.registry.addButton('custom_dialog', {
	                text: 'Open Custom Dialog',
	                onAction: function() {
	                    // Open a Dialog
	                    editor.windowManager.open({
	                        title: 'Custom dialog box',
	                        body: {
	                            type: 'panel',
	                            items: [{
	                                type: 'input',
	                                name: 'custom_data',
	                                label: 'Custom data',
	                                flex: true
	                            }]
	                        },
	                        onSubmit: function (api) {
	                            // insert markup
	                            editor.insertContent('Inserted custom data: ' + api.getData().custom_data);

	                            // close the dialog
	                            api.close();
	                        },
	                        buttons: [
	                            {
	                                text: 'Close',
	                                type: 'cancel',
	                                onclick: 'close'
	                            },
	                            {
	                                text: 'Insert',
	                                type: 'submit',
	                                primary: true,
	                                enabled: false
	                            }
	                        ]
	                    });
	                }
	            });
	        }
	    });
	</script>
</head>
<body>
	<div class="container mt-5">
		<form method="post">
			<div class="form-group">
				<label>Title</label>
				<input type="text" name="title" class="form-control">
			</div>
			<div class="form-group mt-4">
				<label>Content</label>
				<textarea id="tinymce"></textarea>
			</div>

			<button class="btn btn-primary mt-4">Submit</button>
		</form>
	</div>

</body>
</html>
Now you have an idea already of how to set up or add a custom dialog box.
I hope it helps. Thanks for reading :)


Leave a Comment