Laravel 9 Pagination Example using Bootstrap 5
In this post, I will share an example of how to implement Laravel 9 Pagination using Bootstrap 5. Pagination is necessary if you have a table with huge data.
In this post, I will share an example of how to implement Laravel 9 Pagination using Bootstrap 5. Doing pagination on Laravel is necessary if you have a table with huge data and want to display it by page depends on your limit per result.
Step 1: Laravel Installation
To start with our Laravel pagination tutorial. If you don't have a Laravel 9 install in your local just run the following command below:
composer create-project --prefer-dist laravel/laravel crudStep 2: Database Configuration
If your Laravel project is fresh then you need to update your database credentials. Just open the .env file in your Laravel 8 project.
.env
DB_CONNECTION=mysql
DB_HOST=127.0.0.1
DB_PORT=3306
DB_DATABASE=your_database_name_here
DB_USERNAME=your_database_username_here
DB_PASSWORD=your_database_password_here
Step 3: Migration Setup
In this example, we are using the user's table and I will add a username field to this. See below example of our migration.
<?php

use Illuminate\Database\Migrations\Migration;
use Illuminate\Database\Schema\Blueprint;
use Illuminate\Support\Facades\Schema;

class CreateUsersTable extends Migration
{
    /**
     * Run the migrations.
     *
     * @return void
     */
    public function up()
    {
        Schema::create('users', function (Blueprint $table) {
            $table->id();
            $table->string('name')->nullable();
            $table->string('email')->unique();
            $table->string('username')->unique();
            $table->timestamp('email_verified_at')->nullable();
            $table->string('password');
            $table->rememberToken();
            $table->timestamps();
        });
    }

    /**
     * Reverse the migrations.
     *
     * @return void
     */
    public function down()
    {
        Schema::dropIfExists('users');
    }
}
Now let's run the following command below:
php artisan migrateStep 4: Model Setup
Below is the code example of our User model which we're using for our Laravel pagination.
<?php

namespace App\Models;

use Illuminate\Contracts\Auth\MustVerifyEmail;
use Illuminate\Database\Eloquent\Factories\HasFactory;
use Illuminate\Foundation\Auth\User as Authenticatable;
use Illuminate\Notifications\Notifiable;
use Laravel\Sanctum\HasApiTokens;

class User extends Authenticatable
{
    use HasApiTokens, HasFactory, Notifiable;

    /**
     * The database table used by the model.
     *
     * @var string
     */
    protected $table = 'users';

    /**
     * The attributes that are mass assignable.
     *
     * @var array
     */
    protected $fillable = [
        'name',
        'email',
        'username',
        'password',
    ];

    /**
     * The attributes that should be hidden for arrays.
     *
     * @var array
     */
    protected $hidden = [
        'password',
        'remember_token',
    ];

    /**
     * The attributes that should be cast to native types.
     *
     * @var array
     */
    protected $casts = [
        'email_verified_at' => 'datetime',
    ];

    /**
     * Always encrypt password when it is updated.
     *
     * @param $value
     * @return string
     */
    public function setPasswordAttribute($value)
    {
        $this->attributes['password'] = bcrypt($value);
    }
}
Step 5: Generate Fake Data using Faker
Now let's generate fake data for our user's table using the Laravel package, Faker.
In your Database\Factories\UserFactory class, we will modify and implement the faker.
<?php

namespace Database\Factories;

use App\Models\User;
use Illuminate\Database\Eloquent\Factories\Factory;
use Illuminate\Support\Str;

class UserFactory extends Factory
{
    /**
     * The name of the factory's corresponding model.
     *
     * @var string
     */
    protected $model = User::class;

    /**
     * Define the model's default state.
     *
     * @return array
     */
    public function definition()
    {
        return [
            'name' => $this->faker->name(),
            'email' => $this->faker->unique()->safeEmail(),
            'username' => $this->faker->unique()->userName,
            'email_verified_at' => now(),
            'password' => 'test', // password
            'remember_token' => Str::random(10),
        ];
    }

    /**
     * Indicate that the model's email address should be unverified.
     *
     * @return \Illuminate\Database\Eloquent\Factories\Factory
     */
    public function unverified()
    {
        return $this->state(function (array $attributes) {
            return [
                'email_verified_at' => null,
            ];
        });
    }
}
Then in your Database\Seeders\DatabaseSeeder class add the below code inside the run() method:
\App\Models\User::factory(100)->create();Here is the complete code:
<?php

namespace Database\Seeders;

use Illuminate\Database\Seeder;

class DatabaseSeeder extends Seeder
{
    /**
     * Seed the application's database.
     *
     * @return void
     */
    public function run()
    {
        \App\Models\User::factory(100)->create();
    }
}
Now let's run the following command below:
php artisan db:seedAnd it will generate 100 fake data to your user's table.
Step 6: Create Controller & Route for Our Laravel Pagination Example
Run the following command below to create a UsersController
php artisan make:controller UsersControllerThen place the code below in your UsersController file.
<?php

namespace App\Http\Controllers;

use App\Models\User;
use Illuminate\Http\Request;

class UsersController extends Controller
{
    /**
     * Display all users
     *
     * @return \Illuminate\Http\Response
     */
    public function index()
    {
        $users = User::latest()->paginate(10);

        return view('users.index', compact('users'));
    }
}
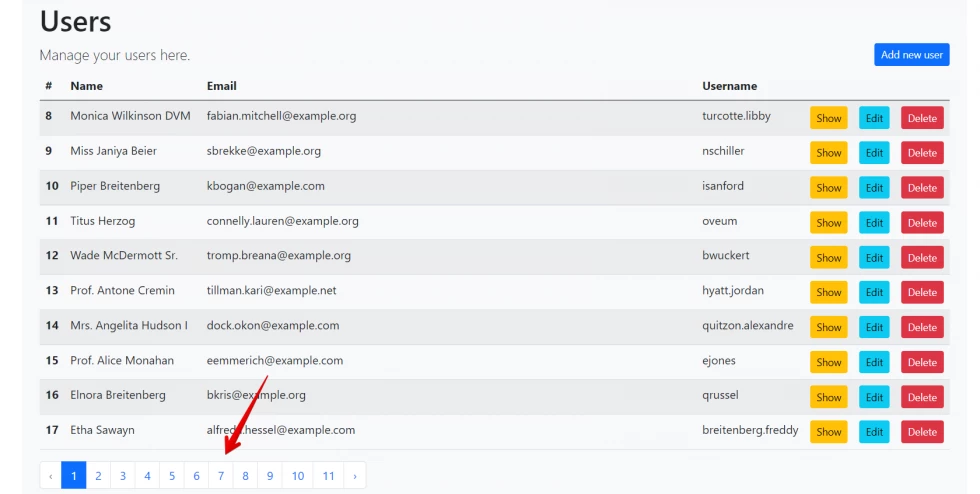
As you can see above we call the paginate() after the latest() method with 10 results on each page. It will allow us to display the results by page. For more info about Laravel pagination just visit it here.
Then create our route:
Route::get('/users', 'App\Http\Controllers\UsersController@index')->name('users.index');Step 7: Add blade view for Our Laravel Pagination
To your resources/views/ create users folder then create index.blade.php
It should be like this now: resources/views/users/index.blade.php
<!DOCTYPE html>
    <html>

    <head>
        <meta charset="utf-8" />
        <meta http-equiv="X-UA-Compatible" content="IE=edge">
        <title>Laravel 8 Pagination Demo - codeanddeploy.com</title>
        <meta name="viewport" content="width=device-width, initial-scale=1">
        <link rel="stylesheet" href="https://cdn.jsdelivr.net/npm/bootstrap@5.0.2/dist/css/bootstrap.min.css">
    </head>

    <body>
        <div class="container mt-5">
            <table class="table table-striped">
                <thead>
                <tr>
                    <th scope="col" width="1%">#</th>
                    <th scope="col" width="15%">Name</th>
                    <th scope="col">Email</th>
                    <th scope="col" width="10%">Username</th>
                </tr>
                </thead>
                <tbody>
                    @foreach($users as $user)
                        <tr>
                            <th scope="row">{{ $user->id }}</th>
                            <td>{{ $user->name }}</td>
                            <td>{{ $user->email }}</td>
                            <td>{{ $user->username }}</td>
                        </tr>
                    @endforeach
                </tbody>
            </table>

            <div class="d-flex">
                {!! $users->links() !!}
            </div>
        </div>
    </body>
</html>
As you can see also above we call the {!! $users->links() !!} function so that the Laravel 9 pagination will display to our view.
Additional:
In your App\Providers\AppServiceProvider class, you need to add the code below inside the boot() function to support the bootstrap paginator.
Paginator::useBootstrap();Complete code:
<?php

namespace App\Providers;

use Illuminate\Pagination\Paginator;
use Illuminate\Support\ServiceProvider;

class AppServiceProvider extends ServiceProvider
{
    /**
     * Register any application services.
     *
     * @return void
     */
    public function register()
    {
        //
    }

    /**
     * Bootstrap any application services.
     *
     * @return void
     */
    public function boot()
    {
        Paginator::useBootstrap();
    }
}
Now you have a basic example of how to implement the Laravel 9 pagination I hope it helps.
Thank you for reading. Happy coding :)




Leave a Comment