Laravel 9 SMS Notification with Vonage API Example
I will show you how to implement Laravel 9 SMS notification using Vonage API (formerly known as Nexmo). Sometimes we need to enable SMS notification.
In this post, I will show you how to implement Laravel 9 SMS notification using Vonage API (formerly known as Nexmo). Sometimes we need to implement a notification that will directly send an SMS to your user transaction.
In my previous post, I shared about Laravel Email Notification and now let's dig into SMS notifications that we can implement along with Email notifications.
Laravel is smoothly working with Vonage API so we will use it as our SMS provider. So if you don't have an account just register here.
Now let's start.
Step 1: Laravel Installation
If you don't have a Laravel 9 install in your local just run the following command below:
composer create-project --prefer-dist laravel/laravel laravel-sms-notificationStep 2: Database Configuration
If your Laravel project is fresh then you need to update your database credentials. Just open the .env file in your Laravel 9 project.
.env
DB_CONNECTION=mysql
DB_HOST=127.0.0.1
DB_PORT=3306
DB_DATABASE=your_database_name_here
DB_USERNAME=your_database_username_here
DB_PASSWORD=your_database_password_here
Step 3: Migration Setup
Here we need to generate first the notifications table before running the migrations. Kindly run the following command:
php artisan notifications:tableBecause we are using phone_number from the user table we need to add this field from your user migration. See below example code.
<?php

use Illuminate\Database\Migrations\Migration;
use Illuminate\Database\Schema\Blueprint;
use Illuminate\Support\Facades\Schema;

class CreateUsersTable extends Migration
{
    /**
     * Run the migrations.
     *
     * @return void
     */
    public function up()
    {
        Schema::create('users', function (Blueprint $table) {
            $table->id();
            $table->string('name')->nullable();
            $table->string('email')->unique();
            $table->string('phone_number')->unique();
            $table->timestamp('email_verified_at')->nullable();
            $table->string('password');
            $table->softDeletes();
            $table->rememberToken();
            $table->timestamps();
        });
    }

    /**
     * Reverse the migrations.
     *
     * @return void
     */
    public function down()
    {
        Schema::dropIfExists('users');
    }
}
If your user already exists then you must add your phone_number column using migration.
Then once done. Kindly run the following command:
php artisan migrateThen once done let's create a seeder for our user. Run the following command:
php artisan make:seeder CreateUsersSeederOnce our seeder is generated kindly to the database/seeders directory. Open the CreateUsersSeeder.php and you will see the following code:
<?php

namespace Database\Seeders;

use App\Models\User;
use Illuminate\Database\Seeder;

class CreateUsersSeeder extends Seeder
{
    /**
     * Run the database seeds.
     *
     * @return void
     */
    public function run()
    {
        User::create([
            'name' => 'Juan',
            'email' => 'email@gmail.com',
            'phone_number' => '63926*******',
            'password' => bcrypt('password')
        ]);
    }
}
Then run the following command:
php artisan db:seed --class=CreateUsersSeederLearn more about Laravel seeder here.
Step 4: Install Package & Connect Vonage API
To work with SMS notifications using Vonage we need to install Vonage channel notification via composer:
composer require laravel/nexmo-notification-channelOnce installed let's connect Vonage API to our Laravel App. Login to your Vonage account and click "Getting started".
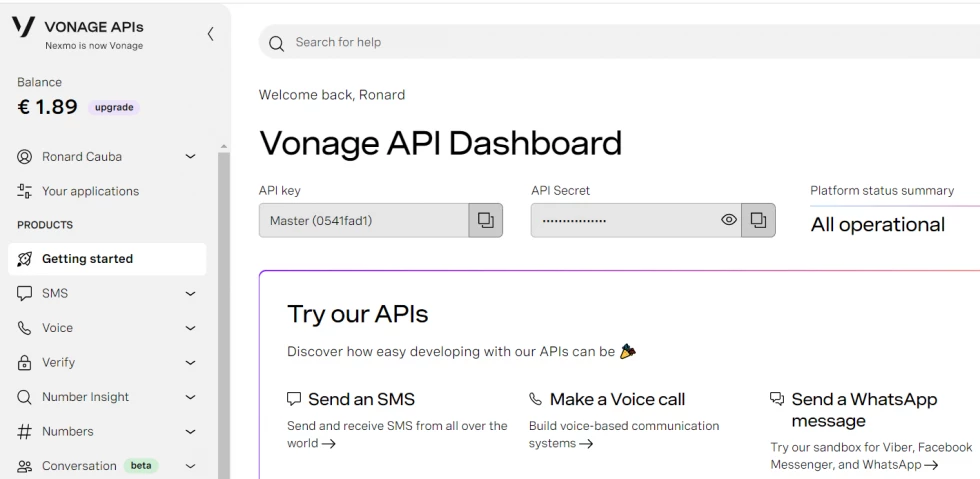
Then add the credentials to your .ENV file.
NEXMO_KEY=key_here
NEXMO_SECRET=secret_here
Next, we will add sms_from it to our config/services.php file. The sms_from is the phone number to use for sending messages and will be sent from.
'nexmo' => [
    'sms_from' => 'Vonage SMS API HERE',
],
Note: You can also use a custom phone number or Sender ID via Vonage dashboard and then set the value here.
Step 5: Create Laravel SMS Notification
Now, let's generate our Laravel SMS notification class example we will name this as SMSNotification. Run the following command to do this.
php artisan make:notification SMSNotificationOnce done, navigate App/Notifications and open EmailNotification.php and then edit it. See the below example:
<?php

namespace App\Notifications;

use Illuminate\Bus\Queueable;
use Illuminate\Contracts\Queue\ShouldQueue;
use Illuminate\Notifications\Messages\MailMessage;
use Illuminate\Notifications\Notification;
use Illuminate\Notifications\Messages\NexmoMessage;

class SMSNotification extends Notification
{
    use Queueable;

    /**
     * @var array $project
     */
    protected $project;

    /**
     * Create a new notification instance.
     *
     * @return void
     */
    public function __construct($project)
    {
        $this->project = $project;
    }

    /**
     * Get the notification's delivery channels.
     *
     * @param  mixed  $notifiable
     * @return array
     */
    public function via($notifiable)
    {
        return ['mail','database','nexmo'];
    }

    /**
     * Get the mail representation of the notification.
     *
     * @param  mixed  $notifiable
     * @return \Illuminate\Notifications\Messages\MailMessage
     */
    public function toMail($notifiable)
    {
        return (new MailMessage)
                    ->greeting($this->project['greeting'])
                    ->line($this->project['body'])
                    ->action($this->project['actionText'], $this->project['actionURL'])
                    ->line($this->project['thanks']);
    }

    /**
     * Get the array representation of the notification.
     *
     * @param  mixed  $notifiable
     * @return array
     */
    public function toDatabase($notifiable)
    {
        return [
            'project_id' => $this->project['id']
        ];
    }

    /**
     * Get the Nexmo / SMS representation of the notification.
     *
     * @param  mixed  $notifiable
     * @return NexmoMessage
     */
    public function toNexmo($notifiable)
    {
        return (new NexmoMessage)
                    ->content($this->project['greeting'] . ' ' . $this->project['body']);
    }

    /**
     * Get the array representation of the notification.
     *
     * @param  mixed  $notifiable
     * @return array
     */
    public function toArray($notifiable)
    {
        return [
            //
        ];
    }
}
Step 6: Setting up Routes
Next, we will create a route for our SMS notification sending. Just open the "routes/web.php" file and add the following routes.
<?php

use Illuminate\Support\Facades\Route;

/*
|--------------------------------------------------------------------------
| Web Routes
|--------------------------------------------------------------------------
|
| Here is where you can register web routes for your application. These
| routes are loaded by the RouteServiceProvider within a group which
| contains the "web" middleware group. Now create something great!
|
*/

Route::get('/', function () {
    return view('welcome');
});

Route::get('/send', '\App\Http\Controllers\HomeController@send')->name('home.send');
Step 7: Setting Up Controller
In this section, we will add our SMS notification in our HomeController as we set in our routes. See below the complete code of our controller:
<?php
namespace App\Http\Controllers;
use Notification;
use App\Models\User;
use Illuminate\Http\Request;
use App\Notifications\SMSNotification;
class HomeController extends Controller
{
public function send()
{
$user = User::first();
$project = [
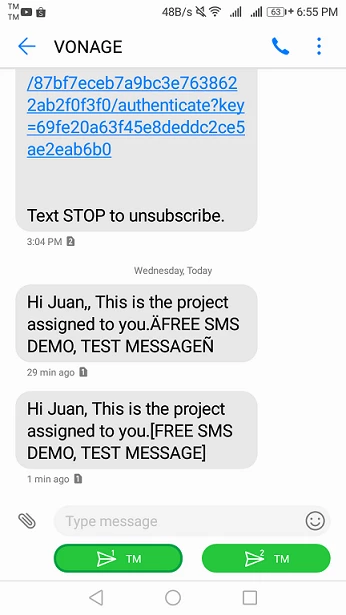
'greeting' => 'Hi '.$user->name.',',
'body' => 'This is the project assigned to you.',
'thanks' => 'Thank you this is from codeanddeploy.com',
'actionText' => 'View Project',
'actionURL' => url('/'),
'id' => 57
];
Notification::send($user, new SMSNotification($project));
dd('Notification sent!');
}
}
Next, we need to add a method for our SMS notification in our model so that the Vonage package will know what column we are using for sending SMS. Add this in your User.php model.
public function routeNotificationForNexmo($notification)
{
    return $this->phone_number;
}
Here is the complete model code.
<?php

namespace App\Models;

use Illuminate\Contracts\Auth\MustVerifyEmail;
use Illuminate\Database\Eloquent\Factories\HasFactory;
use Illuminate\Foundation\Auth\User as Authenticatable;
use Illuminate\Notifications\Notifiable;
use Laravel\Sanctum\HasApiTokens;

class User extends Authenticatable
{
    use HasApiTokens, HasFactory, Notifiable;

    /**
     * The attributes that are mass assignable.
     *
     * @var string[]
     */
    protected $fillable = [
        'name',
        'email',
        'password',
        'phone_number',
    ];

    /**
     * The attributes that should be hidden for serialization.
     *
     * @var array
     */
    protected $hidden = [
        'password',
        'remember_token',
    ];

    /**
     * The attributes that should be cast.
     *
     * @var array
     */
    protected $casts = [
        'email_verified_at' => 'datetime',
    ];

    public function routeNotificationForNexmo($notification)
    {
        return $this->phone_number;
    }
}
Now are good to go and test our SMS notification using Laravel.
You can test it now by running the serve command:
php artisan serveThen run the URL below to your browser to send an SMS notifications to your user.
http://127.0.0.1:8000/sendNow you will see this output in your phone.
The issue for Trial account.

Solution: To prevent the above error you need to register the mobile number you will sending for the test. Visit here for more details.
I hope it helps. Thank you for reading :)


Leave a Comment