Laravel 9 Ajax Example Step by Step Tutorial
In this post, I will give you show you how to implement the Laravel 9 Ajax example with step by step tutorial this will help you understand the basic usage of ajax.
In this post, I will give you show you how to implement the Laravel 8, and 9 Ajax example with step by step tutorial. This example will help you to understand a basic way on how to create an app that will not refresh every time we request to the server. This method will help to lessen the server bandwidth cost and improves the user experience.
What is Ajax Programming?
Ajax is a set of web programming techniques that uses numerous web technologies on the client-side to create asynchronous applications. With Ajax, web applications can request and retrieve data from a server asynchronously without refreshing the page.
Laravel 9 Ajax Example
Now let's apply Ajax to our Laravel 9 application. We will create simple project management that can create and retrieve data via table using ajax.
Step 1: Laravel Installation
Before we start we need to install the Laravel 9 application in our local environment. In this example, I'm using XAMPP via Windows. But you want free to use any machine and OS. To your HTDOCS folder run this command:
composer create-project laravel/laravel laravel-ajax-example --prefer-distOnce done above command run the below command to point our Laravel 9 project directory.
cd laravel-ajax-exampleStep 2: Database Configuration
If your Laravel project is fresh then you need to update your database credentials. Just open the .env file in your Laravel 9 project.
.env
DB_CONNECTION=mysql
DB_HOST=127.0.0.1
DB_PORT=3306
DB_DATABASE=your_database_name_here
DB_USERNAME=your_database_username_here
Step 3: Generate Model, Controller, and Migration
To generate model, controller, and migration for our Laravel ajax example kindly run the following command:
php artisan make:model Project -m -cStep 4: Migration Setup
Let's set up the migration of our projects table see below example code:
<?php

use Illuminate\Database\Migrations\Migration;
use Illuminate\Database\Schema\Blueprint;
use Illuminate\Support\Facades\Schema;

class CreateProjectsTable extends Migration
{
    /**
     * Run the migrations.
     *
     * @return void
     */
    public function up()
    {
        Schema::create('projects', function (Blueprint $table) {
            $table->id();
            $table->string('title');
            $table->string('description');
            $table->timestamps();
        });
    }

    /**
     * Reverse the migrations.
     *
     * @return void
     */
    public function down()
    {
        Schema::dropIfExists('projects');
    }
}
Now let's run the following command below:
php artisan migrateStep 5: Setup Model
Here is the code of our project.php model.
<?php

namespace App\Models;

use Illuminate\Database\Eloquent\Factories\HasFactory;
use Illuminate\Database\Eloquent\Model;

class Project extends Model
{
    use HasFactory;

    protected $fillable = [
    	'title',
    	'description'
    ];
}
Step 6: Setup Controller
Below is the code of our ProjectController.php as you can see we are using Response when responding to the successful request.
<?php

namespace App\Http\Controllers;

use Illuminate\Http\Request;
use App\Models\Project;
use Response;

class ProjectController extends Controller
{
    /**
     * Display a listing of the resource.
     *
     */
    public function index()
    {
        $projects = Project::orderBy('id','desc')->get();
        return view('projects.index')->with(compact('projects'));
    }

    /**
     * Store a newly created resource in storage.
     *
     */
    public function store(Request $request)
    {
        $data = $request->validate([
            'title' => 'required',
            'description' => 'required'
        ]);

        $project = Project::create($data);

        return Response::json($project);
    }
}
Step 7: Setup Routes
Below the code is our routes.
<?php

use Illuminate\Support\Facades\Route;
use App\Http\Controllers\ProjectController;

/*
|--------------------------------------------------------------------------
| Web Routes
|--------------------------------------------------------------------------
|
| Here is where you can register web routes for your application. These
| routes are loaded by the RouteServiceProvider within a group which
| contains the "web" middleware group. Now create something great!
|
*/

Route::get('/', [ProjectController::class, 'index']);

Route::resource('projects', ProjectController::class);
Step 8: Create Project Layout
Below we create a new folder inside resources/views then create a projects folder. Then create index.blade.php.
<!DOCTYPE html>
<html lang="en">
<head>
<meta charset="utf-8">
<meta http-equiv="x-ua-compatible" content="ie=edge">
<meta name="viewport" content="width=device-width, initial-scale=1" />
<meta name="csrf-token" content="{{ csrf_token() }}">
<title>Laravel Ajax Example</title>
<link rel="stylesheet" href="https://cdn.jsdelivr.net/npm/bootstrap@5.1.3/dist/css/bootstrap.min.css">
<style type="text/css">
/* Custom page CSS
-------------------------------------------------- */
/* Not required for template or sticky footer method. */
main > .container {
padding: 60px 15px 0;
}
</style>
</head>
<body class="d-flex flex-column h-100">
<header>
<!-- Fixed navbar -->
<nav class="navbar navbar-expand-md navbar-dark fixed-top bg-dark">
<div class="container-fluid">
<a class="navbar-brand" href="#">Fixed navbar</a>
<button class="navbar-toggler" type="button" data-bs-toggle="collapse" data-bs-target="#navbarCollapse" aria-controls="navbarCollapse" aria-expanded="false" aria-label="Toggle navigation">
<span class="navbar-toggler-icon"></span>
</button>
<div class="collapse navbar-collapse" id="navbarCollapse">
<ul class="navbar-nav me-auto mb-2 mb-md-0">
<li class="nav-item">
<a class="nav-link active" aria-current="page" href="#">Home</a>
</li>
<li class="nav-item">
<a class="nav-link" href="#">Link</a>
</li>
<li class="nav-item">
<a class="nav-link disabled">Disabled</a>
</li>
</ul>
<form class="d-flex">
<input class="form-control me-2" type="search" placeholder="Search" aria-label="Search">
<button class="btn btn-outline-success" type="submit">Search</button>
</form>
</div>
</div>
</nav>
</header>
<!-- Begin page content -->
<main class="flex-shrink-0">
<div class="container">
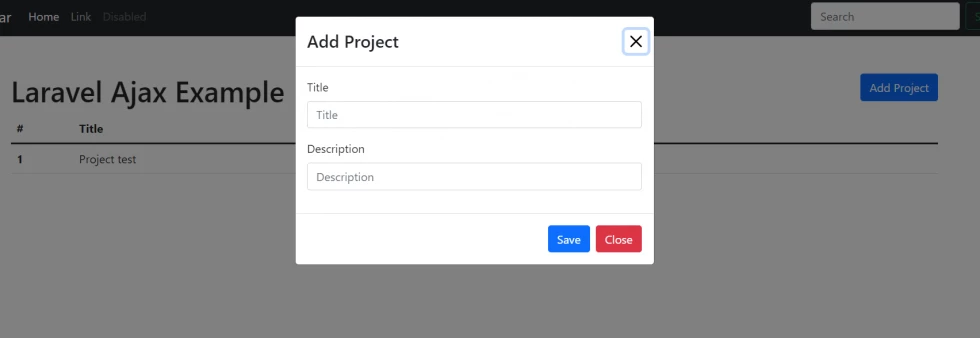
<h1 class="mt-5">Laravel Ajax Example <a href="javascript:void(0)" class="btn btn-primary" style="float: right;" data-bs-toggle="modal" data-bs-target="#add-project-modal">Add Project</a></h1>
<table class="table" id="projects-table">
<thead>
<tr>
<th scope="col">#</th>
<th scope="col">Title</th>
<th scope="col">Description</th>
</tr>
</thead>
<tbody>
@foreach($projects as $project)
<tr>
<th scope="row">{{ $project->id }}</th>
<td>{{ $project->title }}</td>
<td>{{ $project->description }}</td>
</tr>
@endforeach
</tbody>
</table>
</div>
</main>
<!-- The Modal -->
<div class="modal" id="add-project-modal">
<div class="modal-dialog">
<div class="modal-content">
<!-- Modal Header -->
<div class="modal-header">
<h4 class="modal-title">Add Project</h4>
<button type="button" class="btn-close" data-bs-dismiss="modal"></button>
</div>
<form data-action="{{ route('projects.store') }}" method="POST" enctype="multipart/form-data" id="add-project-form">
<!-- Modal body -->
<div class="modal-body">
@csrf
<div class="mb-3">
<label for="title" class="form-label">Title</label>
<input type="text" class="form-control" id="title" placeholder="Title" name="title">
</div>
<div class="mb-3">
<label for="description" class="form-label">Description</label>
<input type="text" class="form-control" id="description" placeholder="Description" name="description">
</div>
</div>
<!-- Modal footer -->
<div class="modal-footer">
<button type="submit" class="btn btn-primary">Save</button>
<button type="button" class="btn btn-danger" data-bs-dismiss="modal">Close</button>
</div>
</form>
</div>
</div>
</div>
<script src="https://code.jquery.com/jquery-3.6.0.min.js" integrity="sha256-/xUj+3OJU5yExlq6GSYGSHk7tPXikynS7ogEvDej/m4=" crossorigin="anonymous"></script>
<script src="https://cdn.jsdelivr.net/npm/bootstrap@5.1.3/dist/js/bootstrap.min.js"></script>
<script src="{{ asset('js/projects.js') }}" defer></script>
</body>
</html>Step 9: Create Javascript for Our Ajax
In this section, we need to create a js folder inside public if already existing just skip it then create a javascript file named projects.js.
$(document).ready(function(){

    var table = '#projects-table';
    var modal = '#add-project-modal';
    var form = '#add-project-form';

    $(form).on('submit', function(event){
        event.preventDefault();

        var url = $(this).attr('data-action');

        $.ajax({
            url: url,
            method: 'POST',
            data: new FormData(this),
            dataType: 'JSON',
            contentType: false,
            cache: false,
            processData: false,
            success:function(response)
            {
                var row = '<tr>';
                    row += '<th scope="row">'+response.id+'</th>';
                    row += '<td>'+response.title+'</td>';
                    row += '<td>'+response.title+'</td>';
                row += '</tr>';

                $(table).find('tbody').prepend(row);


                $(form).trigger("reset");
                $(modal).modal('hide');
            },
            error: function(response) {
            }
        });
    });

});
Don't forget to run the following command after following it:
php artisan serveResult:
Now after following the above tutorial you have a basic idea of how to implement Laravel 9 Ajax with example. I hope it helps :)


Leave a Comment